

Part one of this series covered how to configure the Apostrophe source plugin for Gatsby, how to use piece data from Apostrophe, and basic usage of page data from Apostrophe. In this second part, we will go further with page data in Gatsby, including programmatically creating Gatsby pages and implementing automatically generated navigation based on those pages.
Adding a simple column of HTML to the home page isn't terribly complicated, but what about the other pages? We don't know what pages might have been added in Apostrophe, but we want individual web pages for each one of them here in the Gatsby site.
First of all, this is going to be more advanced stuff. You can do a lot with editing pieces and related media in Apostrophe, then displaying those in Gatsby along with pages you create directly in Gatsby. It might not make sense for you to automatically generate web pages in Gatsby for other pages created in Apostrophe depending on your content strategy.
If you are interested in this and are up for getting a little crazy, let's keep going. There is a whole Gatsby tutorial on programmatically creating pages that helped me and is another great resource.
Set up some demo data
If you're coming from the first part, you might already have the Apostrophe site still running. If it is running and you're logged in (see part one) add a few default-type pages as practice data. My example here will include an "About" page at /about/our-history, a child page of the "About" page.
Programmatically creating Gatsby pages from Apostrophe pages
There are a few concepts we'll use to generate these pages:
- Gatsby page templates - Like the other pages we've made already, these are React components that are used to generate pages from some external data source. Unlike the
program.js,staff.js, andindex.jscomponents, we don't know at what URL they will appear since they are simply templates for future pages. - Gatsby nodes and the Node API - In Gatsby, nodes are the units of content, like our programs, staff members, and pages, that you can query through the GraphQL database. The Node API includes many hooks and methods to interact with those nodes and do things with them.
To start, take a look at src/templates/apos-page.js. It should look familiar since it is similar in many ways to the other pages we made. Like the home page template we populated in the first part of this series, this page template has a template where _rendered HTML will be added, as well as other imports that we're using elsewhere. What it doesn't have yet is a query to populate the data and whatever is going to be happening with the subNav variable that is instantiated.
That file will be the template for pages generated from Apostrophe page data. There will be a few steps we need to go through to make that happen:
- Use the
createPagesGatsby API to query for Apostrophe pages and create page nodes from each. - Update the
apos-page.jstemplate to get the new Gatsby page data for displaying, along with child pages for the sub-navigation.
Create Gatsby pages with createpage actions, context properties, and page query data
This first part will happen in the gatsby-node.js file. This file is run once when the site is building, so is the place to do work you need only during that build process. The Node APIs reference is a good place to see the breadth of what you can do there. We're going to be using the createPages API here.
First, add the exports.createPages function to the file. Everything we do will be inside that. We're destructuring the argument Gatsby passes to access the graphql utility and actions object to start.
exports.createPages = async ({ graphql, actions }) => {}The next step inside that function is to query for all of the Apostrophe pages provided via the Apostrophe source plugin and store the result. Add the following inside the function:
exports.createPages = async ({ graphql, actions }) => {
  const result = await graphql(`
    query {
      allAposCorePage {
        nodes {
          title
          _url
          slug
          _rendered
        }
      }
    }
  `)
}
We saw a few GraphQL queries in the first part, so this should be familiar if you read that. This is using the allAposCorePage field and returning the nodes with their title, URL, slug, and rendered HTML. We'll then loop over each one and use one of the aforementioned "actions" to create a page using the data. This is done with the createPage action, specifically.
So below this query statement, add:
exports.createPages = async ({ graphql, actions }) => {
  // The `result` query from above is here

  const { createPage } = actions

  result.data.allAposCorePage.nodes.forEach(node => {
    createPage({
      path: node.slug,
      component: path.resolve(`./src/templates/apos-page.js`),
      context: {
        title: node.title,
        slug: node.slug,
        slugregex: "/^\\" + node.slug + "//",
      },
    })
  })
}
As described, this is looping over each of the result nodes (result.data.allAposCorePage.nodes.forEach) and creating a Gatsby page from each. Our new pages use the Apostrophe slug property for their URL paths. We're telling it to use the apos-page.js template as its React component file, then setting context properties.
As Gatsby's documentation describes, "data passed to context is available in page queries as GraphQL variables." We're storing the title, slug, and a regular expression version of the slug on that object. The latter one might seem odd, but later we'll want to use the slug in a query as regex and string interpolation is not allowed in GraphQL queries. Easier to get that out of the way here.
At this point, Gatsby pages are created in the GraphQL database (you may have to restart the Gatsby app if you've hit major errors while editing these files). We can see those pages with a simple query:
query MyQuery {
  allSitePage {
    nodes {
      path
    }
  }
}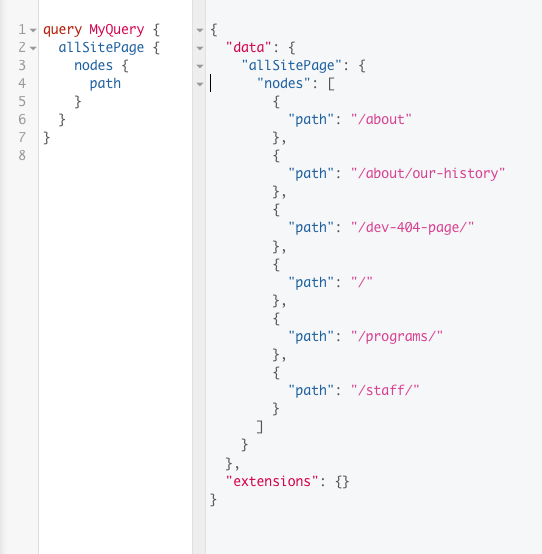
From the image above, you can see that the pages I created in my Apostrophe site at /about and /about/our-history are now in the database. The 404 page and home page are default pages for Gatsby and the other two, for programs and staff, are ones we created in the first part.
Note that if you add pages to you Apostrophe site while the Gatsby site is running, they likely won't show up right away in the GraphQL database. Gatsby is a static site generator, so it won't find anything until the site is re-built. At any point, if you aren't getting the fresh Apostrophe data you expect, try running gatsby clean && gatsby develop to clear its cache before starting it back up.
Even though those pages are in the database, if you also have a page there and go to http://localhost:8000/about (probably after restarting the Gatsby build) you'll probably see an error reading, "The page didn't server render (SSR) correctly." Our pages exist, but our template is not ready for them yet.
Page data to rendered templates
Like with the home page and other pages in the first part, this one will require us to make a query of the GraphQL database. That query will populate the data object passed into the React component.
This query will look like the home page query, with some differences:
export const query = graphql`
  query($slug: String!) {
    aposCorePage(slug: { eq: $slug }) {
      title
      _rendered
    }
  }
`
The home page query in index.js had the '/' slug hard-coded (as it is the home page). This one gets the slug as $slug from the context object established in the createPage methods previously. This is also getting the title property, which the home page query did not.
My page at http://localhost:8000/about now looks like this:
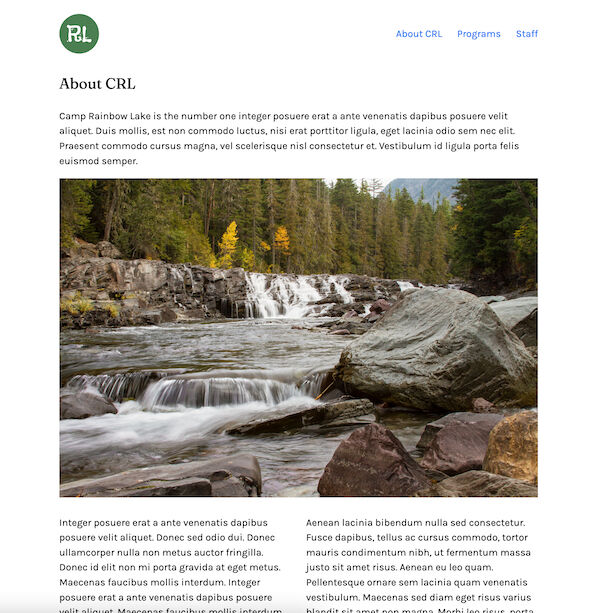
Excellent! It's a page! And it's even in the site navigation, thanks to code in the Header.js component. (Feel free to explore that on your own once you go through the rest of this. It will make more sense then, but we won't be going into it in depth in this tutorial.)
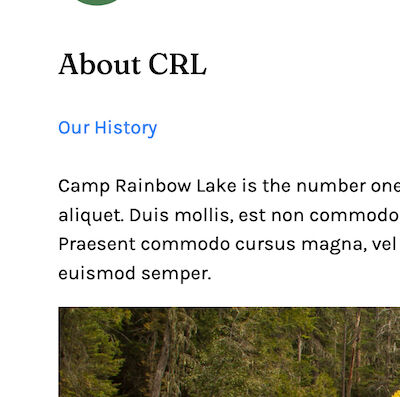
I also have a page at http://localhost:8000/about/our-history, but there's no link to it. This "About" page has a link in the main site navigation, but we can identify the "Our history" page as a child of "About" and show it on that parent page.
To do that, we'll expand the apos-page.js query and use that slugregex context property.
export const query = graphql`
  query($slug: String!, $slugregex: String!) {
    aposCorePage(slug: { eq: $slug }) {
      title
      _rendered
    }
    allSitePage(
      filter: { path: { regex: $slugregex } }
      sort: { fields: [path], order: ASC }
    ) {
      edges {
        node {
          context {
            title
            slug
          }
        }
      }
    }
  }
`
We're bringing in slugregex and then using it in an allSitePage query that is filtered to return only pages whose path starts with the current page's slug. We can now update the subNav variable in the component. If there are results to show we can populate that with simple object containing the page titles and slugs.
export default function AposPage({ data }) {
  const page = data.aposCorePage
  let subNav = []
  if (data.allSitePage && data.allSitePage.edges) {
    subNav = data.allSitePage.edges.map(e => {
      return {
        title: e.node.context.title,
        slug: e.node.context.slug,
      }
    })
  }
  //...
}
Inside the ul tags in the template, we can add a map over the sub-navigation array with list item and link markup:
return (
  <Layout>
    <>
      <header>
        <h1 className="text-2xl mb-6">{page.title || ""}</h1>
        {!!subNav.length && (
          <nav className="mb-6">
            <ul>
              {subNav.map(item => {
                return (
                  <li className="mr-6" key={item.slug}>
                    <a
                      className="text-blue-500 hover:text-blue-800"
                      href={item.slug}
                    >
                      {item.title}
                    </a>
                  </li>
                )
              })}
            </ul>
          </nav>
        )}
      </header>
      {page._rendered && (
        <div dangerouslySetInnerHTML={{ __html: page._rendered }} />
      )}
    </>
  </Layout>
)
With everything in place, our child pages should now display as a link under the page title on the "About" page. Pretty cool!
At the journey's end
That's it! Hopefully you have a good understanding now of not only how to use the Apostrophe source plugin for Gatsby, but of some interesting ways to use the Apostrophe data to populate, and create, Gatsby pages. Moreover, we hope you look to ApostropheCMS to support these types of projects moving forward.
There is more to explore in the demo code for you to explore. See that in the demo Gatsby site's repo with the finished code in the part-2 branch.
Other links:
- If you have any questions, please reach out to our team (@apostrophecms) or me (@alexbea) on Twitter, or join us in Discord chat: https://discord.com/invite/XkbRNq7.
- The demo Gatsby site: https://github.com/apostrophecms/gatsby-demo-apostrophe
- The demo Apostrophe 3 site, set up as a headless CMS with starter piece types: https://github.com/apostrophecms/demo-a3-headless