Extensions & Integrations
Automatic Translation
Automatic Translation
![]()

Scale your content globally with AI-powered translation for ApostropheCMS. Transform your localization workflow with automatic translation that handles pages, pieces, and complex content structures. Supporting DeepL, Google Cloud Translation, Azure Translator, and custom translation providers with intelligent retry mechanisms and customizable field mapping.
Why Automatic Translation?
- 🌍 Global Content, Zero Friction: Transform your content into multiple languages instantly during the localization process
- 🎯 Production-Ready Quality: Support for professional translation providers including DeepL, Google Cloud, Azure Translator, and custom providers
- ⚡ Smart Field Handling: Automatically translates text fields, rich content, and widgets while preserving formatting
- 🔧 Developer Friendly: Extensive customization options for field mapping, widget handling, and custom field types
- 📋 Translation Workflow: Streamlined process for submitting content for translation and reviewing AI-generated results before publishing
Installation
Note: This module requires an ApostropheCMS Pro license. Don't have Pro yet? Create an account on Apostrophe Workspaces or contact us and get started with ApostropheCMS Pro to access this and other Pro extensions.
npm install @apostrophecms-pro/automatic-translation
Quick Start Guide
Choose your preferred translation provider and follow the setup instructions below. All providers offer professional-grade translation quality with different strengths and pricing models.
DeepL Setup
Get your API key from your DeepL Account. Copy the key from the "Authentication Key for DeepL API" section.
Environment variable setup (recommended):
export APOS_DEEPL_API_SECRET=your-key-here
npm start
Configuration:
import apostrophe from 'apostrophe';

apostrophe({
  root: import.meta,
  shortName: 'my-project',
  modules: {
    '@apostrophecms-pro/automatic-translation': {
      options: {
        provider: 'deepl'
      }
    },
    '@apostrophecms-pro/automatic-translation-deepl': {}
  }
});
Alternative configuration with API key in code:
import apostrophe from 'apostrophe';

apostrophe({
  root: import.meta,
  shortName: 'my-project',
  modules: {
    '@apostrophecms-pro/automatic-translation': {
      options: {
        provider: 'deepl'
      }
    },
    '@apostrophecms-pro/automatic-translation-deepl': {
      options: {
        apiSecret: 'your-key-here'
      }
    }
  }
});
Language Mapping for DeepL
Your project locales might not match exactly with DeepL's supported languages. Configure mappings as needed:
'@apostrophecms-pro/automatic-translation-deepl': {
  options: {
    // Map project locales to DeepL source languages (no country codes supported)
    sourcesMapping: {
      'en-US': 'en',
    },
    // Map project locales to DeepL target languages
    targetsMapping: {
      'en-GB': 'en-US', // DeepL doesn't support 'en' for targets
      'pt': 'pt-PT'     // Default mapping provided
    }
  }
}
Note: DeepL sources only support languages without country codes. The module removes country codes by default, so you might not need source mapping. Some default target mappings are provided for common locales like en and pt to avoid errors.
For supported languages, check the DeepL documentation.
Translation Provider Setup
Google Cloud Translation
Requires a Google Cloud project with Translation API enabled and a service account key. Complete setup guide.
Environment variables (recommended):
export APOS_GOOGLE_TRANSLATE_PROJECT_ID=your-project-id
export APOS_GOOGLE_TRANSLATE_KEY_FILENAME=/path/to/keyfile.json
npm start
Configuration:
import apostrophe from 'apostrophe';

apostrophe({
  root: import.meta,
  shortName: 'my-project',
  modules: {
    '@apostrophecms-pro/automatic-translation': {
      options: {
        provider: 'google'
      }
    },
    '@apostrophecms-pro/automatic-translation-google': {}
  }
});
Alternative configuration with credentials in code:
import apostrophe from 'apostrophe';

apostrophe({
  root: import.meta,
  shortName: 'my-project',
  modules: {
    '@apostrophecms-pro/automatic-translation': {
      options: {
        provider: 'google'
      }
    },
    '@apostrophecms-pro/automatic-translation-google': {
      options: {
        projectId: 'your-project-id',
        keyFilename: '/path/to/keyfile.json'
      }
    }
  }
});
Azure AI Translation
Get your API key from Azure AI Services. Follow the Azure documentation to create a Translator resource and obtain your authentication key.
Environment variable (recommended):
export APOS_AZURE_API_SECRET=your-key-here
npm start
Configuration:
import apostrophe from 'apostrophe';

apostrophe({
  root: import.meta,
  shortName: 'my-project',
  modules: {
    '@apostrophecms-pro/automatic-translation': {
      options: {
        provider: 'azure'
      }
    },
    '@apostrophecms-pro/automatic-translation-azure': {}
  }
});
Alternative configuration with API key in code:
import apostrophe from 'apostrophe';

apostrophe({
  root: import.meta,
  shortName: 'my-project',
  modules: {
    '@apostrophecms-pro/automatic-translation': {
      options: {
        provider: 'azure'
      }
    },
    '@apostrophecms-pro/automatic-translation-azure': {
      options: {
        apiSecret: 'your-key-here'
      }
    }
  }
});
Language Mapping for Azure
Your project locales might not match exactly with Azure's supported languages. Configure mappings as needed:
'@apostrophecms-pro/automatic-translation-azure': {
  options: {
    // Map project locales to Azure language codes
    languageMapping: {
      'en-US': 'en',
      'pt': 'pt-PT',     // Default provided by module
      'pt-BR': 'pt'      // Default provided by module
    }
  }
}
Important: Setting a custom languageMapping completely overrides the default mappings. If you need the defaults (like pt: 'pt-PT'), you must include them explicitly in your custom mapping.
Advanced Azure Configuration
Optional settings for specific Azure service configurations:
'@apostrophecms-pro/automatic-translation-azure': {
  options: {
    region: 'eastus',  // Required for multi-service or regional resources
    baseUrl: 'https://api.cognitive.microsofttranslator.com',  // Custom domain
    translateOptions: {
      // Additional query parameters for Azure Translation API
      // See Azure documentation for available options
      category: 'general',
      profanityAction: 'NoAction'
    }
  }
}
How It Works
When configured, the module adds a "Translate text content" option to the localization dialog. It will show a new Translate text content option under the Automatic translation settings section in the localization dialog. This intelligently translates:
- All
stringandslugfields throughout your content structure - Rich text widgets with proper HTML preservation
- Custom widgets and nested content structures
- Area widgets while maintaining layout and formatting
- The
htmlwidget is disabled by default. You can enable it in your project by setting thetranslateoption to true in the widget module definition (see the "Configure widgets" section below).
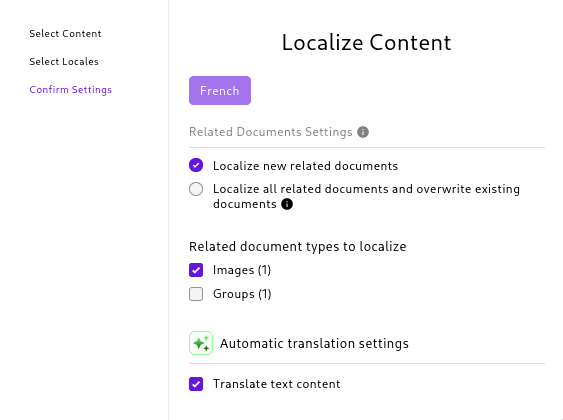
Only languages supported by both your project and the selected translation provider will be available for translation. It will skip the translation when a language is not supported, and show a message about it.
Configuration Options
Module-Level Settings
Configure retry behavior and rate limiting:
'@apostrophecms-pro/automatic-translation': {
  options: {
    provider: 'deepl',
    retryBaseDelayMs: 1000,  // Default initial retry delay (1 second)
    retryMaxAttempts: 5      // Default maximum retry attempts
  }
}
Retry Mechanism: The module automatically handles rate limiting from translation providers using exponential backoff. When a provider responds with a 429 (Too Many Requests) error, the module will retry with increasing delays calculated as:
delay = lastDelay * 2 * (1 + random(0, 1))
Where lastDelay is the delay of the previous attempt with an initial value retryBaseDelayMs and random(0, 1) is a random number between 0 and 1. The retry attempts will be stopped when the retryMaxAttempts is reached. This ensures reliable translation even during high-traffic periods or when hitting API rate limits.
Field-Level Control
Exclude specific fields from translation:
// modules/my-module/index.js
export default {
  fields: {
    add: {
      internalCode: {
        type: 'string',
        label: 'Internal Reference Code',
        translate: false  // Skip translation
      },
      description: {
        type: 'string',
        label: 'Product Description'
        // Will be translated by default
      }
    }
  }
};
Widget-Level Control
Control translation for entire widget types:
// modules/my-widget/index.js
export default {
  extend: '@apostrophecms/widget-type',
  options: {
    label: 'My Custom Widget',
    translate: false  // Skip all fields in this widget
  }
};
Or disable specific widget instances in areas:
// modules/my-page/index.js
export default {
  fields: {
    add: {
      main: {
        type: 'area',
        options: {
          widgets: {
            'code-block': {
              options: {
                translate: false  // Don't translate code examples
              }
            },
            'rich-text': {}  // Will be translated
          }
        }
      }
    }
  }
};
User Interface Customization
Custom Labels and Disclaimers
There are two keys available for altering and localizing the text for the translation checkbox:
automaticTranslationCheckboxHelpused to display additional details or acknowledgement after the Translate text content checkbox labelautomaticTranslationDisclaimerused to display a disclaimer to your users before the Translate text content checkbox
Create modules/@apostrophecms/i18n/i18n/en.json to customize user-facing text:
{
  "automaticTranslationCheckboxHelp": "By clicking the below checkbox, you acknowledge that translations are generated by AI and may require review.",
  "automaticTranslationDisclaimer": "Translations are produced by AI. They can be inaccurate, omit nuance, or introduce formatting issues. Review all translated content before you publish."
}
Change the "Translated with AI" indicator in modules/@apostrophecms-pro/automatic-translation/i18n/en.json:
{
  "fieldMeta": "AI Translated ✨"
}
Advanced Development
Custom field types
If you have custom field types that contain text, and you want to translate them, you can adapt the type slightly to support that. Here is a basic example of a custom field type that supports translation:
// in modules/my-module/index.js
module.exports = {
  init(self) {
    self.apos.schema.addFieldType({
      // This indicates that the field type supports translation
      translate: true,
      name: 'myCustomField',
      // Let's assume the field contains just text
      convert(req, field, data, object) {
        const input = data[field.name];
        object[field.name] = self.apos.launder.string(input);
      },
      vueComponent: 'MyCustomField'
    });
  }
};
In this example, we have a simple field type that contains plain text (not HTML). We set the translate option to true and the module will automatically translate the field when localizing the document.
A more advanced example would be a field type that contains e.g., an object with some text properties. In that case, you would need to implement the getText and convertText methods in the field type definition:
// in modules/my-module/index.js
module.exports = {
  init(self) {
    self.apos.schema.addFieldType({
      // This indicates that the field type supports translation
      translate: true,
      name: 'myCustomField',
      convert(req, field, data, object) {
        // ... your logic here
      },
      getText(field, value, valuePath, schemaPath) {
        // let's assume the field value contains two properties of interest -
        // `text1` and `text2`.
        // For every item of the returned array, `convertText` method will be called
        // with `translated` value and the item as `meta` object.
        return [
          // Export `text1` for translation
          {
            valuePath: [ ...valuePath, field.name, 'text1' ],
            schemaPath: [ ...schemaPath, field.name ],
            text: value.text1,
            type: field.type
          },
          // Export `text2` for translation
          {
            valuePath: [ ...valuePath, field.name, 'text2' ],
            schemaPath: [ ...schemaPath, field.name ],
            text: value.text2,
            type: field.type
          },
          // You can also export only meta information in order to
          // mark the field as "translated" in the UI. Add custom property
          // `original` that can be accessed in the `convertText` method.
          // See full explanation of metaOnly below.
          {
            metaOnly: true,
            valuePath: [ ...valuePath, field.name ],
            schemaPath: [ ...schemaPath, field.name ],
            original: value,
            type: field.type
          }
        ]
      },
      // `translated` is our entire object for the meta only field, and the
      // text for the other fields that we have exported in the `getText` method.
      // `meta` is the meta information that we have exported in the `getText` method.
      convertText(translated, meta) {
        // If the metaOnly result is passed, we can compute.
        // See full explanation of metaOnly below
        if (meta.metaOnly) {
          const { original, valuePath, type } = meta;
          // Compute the changed state of the field.
          // This data will be available in the UI indicator component
          return {
            valuePath,
            type,
            changed: original.text1 !== translated.text1 || original.text2 !== translated.text2
          };
        }

        // For our text data, we can use the `he` library to decode HTML entities
        // that were eventually encoded by the translation provider.
        // Or you can just return the translated text as is.
        const converted = he.decode(translated || '');
        return {
          ...meta,
          translated: converted,
          changed: meta.text.trim() !== converted.trim()
        };
      },
      vueComponent: 'MyCustomField'
    });
  }
};
Learn more about the translation and field metadata in the dedicated section below.
In your Vue component, you can pass the meta information so that the "Translated" indicator can be displayed:
<template>
  <!-- Add :meta="fieldMeta" prop here -->
  <AposInputWrapper
    :modifiers="modifiers" :field="field"
    :error="effectiveError" :uid="uid"
    :display-options="displayOptions"
    :meta="fieldMeta"
  >
  <!-- ... your input component here -->
  </AposInputWrapper>
</template>

<script>
import AposInputMixin from 'Modules/@apostrophecms/schema/mixins/AposInputMixin';
export default {
  name: 'AposInputString',
  // the mixin will handle the meta information
  mixins: [ AposInputMixin ],
  // ... your component logic here
}
</script>
Advanced widget support
Your widget can override the default text extraction if needed. By default, the widgets will use getText and convertText on their underlying field schema. If this is not working for your custom widget, you can override this behavior and return your desired list of properties to be translated. You can do this by implementing the getTranslationText and convertTranslationText methods in your widget module:
// in modules/my-widget/index.js
module.exports = {
  extend: '@apostrophecms/widget',
  options: {
    label: 'My Widget',
    translate: true
  },
  methods(self) {
    return {
      getTranslationText(value, schemaPath) {
        // ... your logic here
      },
      convertTranslationText(translated, meta) {
        // ... your logic here
      }
    };
  }
};
getTranslationText and convertTranslationText methods implement the same logic as getText and convertText methods in the custom field type example. The only difference is that getTranslationText receives only the widget value and the schema path. The method names are different to avoid conflicts with existing methods in the widget modules. Learn more about the translation meta and the methods logic in the next section.
Your custom translation methods should carry the logic of extracting and converting the text from the widget value.
You can look at the code in modules/@apostrophecms-pro/automatic-translation-rich-text-widget for an advanced example of how to handle widget-specific text extraction and conversion.
Translation meta and field meta explained
First, let's clarify the terms.
Translation meta, in the context of this module, is the information extracted from a document in the form of a list of objects, each containing information about:
- the path to a text value in the document
- the type of field that owns the text
- any additional information that might be useful for the translation provider, the current field type or the UI
Keep in mind that one schema field can have multiple text values, and each of them will be translated separately, and exported as a separate meta object.
Field meta is field-specific information that is added to the document. This is a core feature that allows the storage of additional information about a schema field. This feature is currently used to store the "changed" status of the field after translation, the "original" text and the document value path to the text.
How it works?
- The document translation meta is extracted from the document. It contains per-field meta (as explained above). Here is where the
getTextmethod per field is used. - The translation provider translates the text and returns the translated text.
- The
convertTextmethod is called on every translated text. This allows the field type to perform any formatting on the translated text (e.g. escape HTML entities when required) but also to add additional meta information. For example, we addchangedstatus by comparing the original and translated text. - The translated text replaces the original text in the document.
- The translation meta per field is stored as a field meta in the document.
- The UI can use the field meta to display the "Translated" indicator.
Basic example
Let's look closer at the getText logic and its return format. A typical text field will be handled similarly to this:
getText(field, value, valuePath, schemaPath) {
  return [
    {
      valuePath: [ ...valuePath, field.name ],
      schemaPath: [ ...schemaPath, field.name ],
      text: value,
      type: field.type
    }
  ];
}
The field argument is the schema field definition, value is the value of the field in the document. valuePath is an array of parent field names that lead to the current field, something we call pathComponents. The method should always (with one exception explained below) return an array of objects, each containing the valuePath, the text and the type of the field. The schemaPath is an array of parent field names that lead to the current field in the schema. This is useful when you need to extract additional meta data from the schema fields for a given translation meta item. You can use the eachSchemaField(schemaPath, schema, callback) method to walk through the schema fields and call a callback on each of them (see below for more details).
Adding more arbitrary properties to the object is allowed.
With the simple example above, the next step according to our logic is to call the convertText method for each of the returned objects when the translation is done. The convertText method will receive the translated text and the meta object. Here is an example of how the corresponding convertText method can look like:
convertText(translated, meta) {
  const converted = he.decode(translated || '');

  return {
    ...meta,
    translated: converted,
    changed: meta.text.trim() !== converted.trim()
  };
}
The same meta object that was returned from the getText method is passed to the convertText method. We add the translated property to the meta object after converting the translated text.
We use the he package to unescape any HTML entities that might have been encoded by the translation provider. We also add the changed status to the meta object. This status is used by the UI to display the "Translated" indicator. Any additional properties that are added to the meta object will be stored later as field meta in the document.
After the conversion, our meta object will look like this:
{
  valuePath: [ 'myField' ],
  text: 'Original text',
  type: 'string',
  translated: 'Translated text',
  changed: true
}
The internal bundle engine will first use this to replace the translated text in the document. It will set doc.myField to Translated text. Then, it will store some of the properties as field meta in the document, using code similar to the following:
self.apos.schema.setMeta(doc, '@apostrophecms/automatic-translation', 'myField', 'data', {
  valuePath: 'myField',
  text: 'Original text',
  type: 'string',
  changed: true
});
The payload (last argument) will be stored in a key, data for the path (path components) myField under namespace @apostrophecms/automatic-translation in the document.
Private meta properties
It's possible to pass useful data between getText and convertText while keeping those private, not saved as field meta in the document. Here is an example with a private property original:
getText(field, value, valuePath, schemaPath) {
  // Logic that would extract `/parent-path/my-slug` from the value
  // and transform it to `my slug`.
  const slugText = transformSlugToText(value);
  return [
    {
      valuePath: [ ...valuePath, field.name ],
      schemaPath: [ ...schemaPath, field.name ],
      text: slugText,
      original: value,
      type: field.type,
    }
  ];
},
convertText(translated, meta) {
  const { original, ...rest } = meta;
  // Logic that will transform `my translated slug`
  // to `/parent-path/my-translated-slug`
  const slug = transformTextToSlug(translated, original);

  // Omit the `original` property from the meta object
  return {
    ...rest,
    translated: slug,
    changed: original.trim() !== slug.trim()
  };
}
The original property is introduced in the getText method and is passed to the convertText method after successful translation. The original property is omitted from the returned meta object in the convertText method. The original property is not saved as metadata in the document. It's a private property used internally to deliver data between the getText (before translation) and convertText (after translation) methods.
Unique value path
The previous example works well for simple, root-level document properties. What about widgets and array items? The problem with these is that their position in the document may change. To address this, we need to use a unique value path. Luckily, this is already handled well by the Apostrophe core. Every array or area item has a unique _id property. A unique path to any such item is possible by using @{_id} as a starting path component. Here is an example of a rich text widget value:
{
  _id: 'uniqueId',
  content: 'Original text',
  // ... other properties
}
Its path components would be:
[ '@uniqueId', 'content' ]
The string version of the path above is @uniqueId.content. The methods for the rich text widget would look like this:
getTranslationText(value, schemaPath) {
  return [
    {
      valuePath: [ `@${value._id}`, 'content' ],
      metaPath: [ `@${value._id}` ],
      schemaPath,
      text: value.content,
      type: field.type
    }
  ];
},
convertTranslationText(translated, meta) {
  // No need to transform the text, as it's already HTML
  return {
    ...meta,
    translated,
    changed: meta.text.trim() !== translated.trim()
  };
}
You might have noticed that we have introduced a new metaPath property. Most of the time the path components passed to the apos.schema.setMeta() are the same as our valuePath that represents the path components to the document value. However, in the case of more complex value structures, this won't be the case anymore. When available, metaPath will be used to store the field meta in the document:
self.apos.schema.setMeta(doc, '@apostrophecms/automatic-translation', '@uniqueId', 'data', {
  valuePath: '@uniqueId.content',
  text: 'Original text',
  type: 'string',
  changed: true
});
Here we have widgetValue.content property, containing the text we want to translate. The content property is an internal implementation detail and it should not be used when adding the field meta. We can use metaPath in order to provide the value as required by the apos.schema.setMeta() method.
Meta only fields and the metaOnly property
Let's look at another scenario - array fields. The array field does not directly participate in translation but returns the array of fields that should be translated for its schema. At the same time, we need a way to add field meta for the array field so that the UI can see that this array field has "changed" status. We can use a separate meta object and the metaOnly property for that. Here is an example of how the getText and convertText methods can look like for an array field (pseudo code):
getText(field, value, valuePath, schemaPath) {
  // Extract the translation meta for the array items
  const meta = getChildrenMeta(field.schema, value);

  // Add the meta for the array field itself
  if (meta.length) {
    meta.push({
      metaOnly: true,
      valuePath: [ ...valuePath, field.name ],
      schemaPath: [ ...schemaPath, field.name ],
      type: field.type
    });
  }

  return meta;
},
convertText(translated, meta) {
  // This should never happen.
  if (!meta.metaOnly) {
    throw new Error('This method should be called only for my meta only fields');
  }
  return {
    ...meta,
    changed: translated.length > 0
  };
}
The getText retrieves the translation meta for the array items. It also adds a meta object for the array field itself. It sets the metaOnly property to true in the array field meta. The text property is ignored. This meta object will NOT be sent to the translation provider. It will be used to store field meta in the document after the translation is performed and added to the document. Furthermore, the convertText method will be called only for the meta array field. The translated argument will be the array value retrieved from the document, using the valuePath provided in the array meta object. The engine uses apos.util.get(valuePath) under the hood to retrieve the value from the document. The convertText method will add the changed status to the meta object and the engine will store the meta object as field meta in the document:
self.apos.schema.setMeta(doc, '@apostrophecms/automatic-translation', 'myArray', 'data', {
  valuePath: 'myArray',
  type: 'array',
  changed: true
});
The schemaPath property and the eachSchemaField method
The schemaPath property is an array of parent field names that lead to the current field in the schema. It is useful for external modules or project level code that extracts manually document text via the extractText method. The eachSchemaField(schemaPath, schema, callback) method can be used to walk through the schema fields and call a callback on each of them, allowing you to extract additional meta data from the schema fields for a given translation meta item. The callback function is called with two arguments: field and context. The field object is the schema field definition or a widget module. The context.isWidget property is a boolean indicating if the field is a widget object.
Here is an example of how to use it:
// As already mentioned, the `schemaPath` property is an array of parent field names that lead to the current field in the schema. You can grab it from the translation meta object.
const schemaPath = ['main', 'widget:@apostrophecms/rich-text'];
const fieldLabels = [];
self.apos.modules['@apostrophecms-pro/automatic-translation']
  .eachSchemaField(schemaPath, schema, (field, { isWidget }) => {
    // Extract additional meta data from the schema fields
    // for a given translation meta item. In this case, we extract the field labels.
    // Keep in mind in a real world you might want to use `req.t(label)` to translate it.
    fieldLabels.push(
      isWidget ? field.options.label : field.label
    )
  });
Custom Translation Providers
Creating your own translation provider is also supported.
- Create a folder
modules/my-providerin your project. Add a fileindex.jswith the following content:
module.exports = {
  init(self, options) {
    self.apos.modules['@apostrophecms-pro/automatic-translation']
      .registerProvider(self, {
        name: 'my-provider',
        label: 'My Provider'
      });
  },

  methods(self) {
    return {
      async translate(req, data, sourceLanguage, targetLanguage, options) {
        // Get the text to translate from the `source` language code
        // to the `target` language code
        const texts = data.fields.map(m => m.text);

        // Your translation logic here. Array of translated text (string) is expected
        // with the exact same order (index) as the input text.
        // Your provider should support HTML text. The internal engine expects HTML support and
        // unescapes HTML entities for non-HTML text fields after successful translation.
        const translatedTextArray = self.translateTextWithMyProvider(
          texts,
          sourceLanguage,
          targetLanguage
        );

        // Finally, return the translated text in this format.
        // The `state` can be `translated` or `failed`.
        // If it's `failed`, fields should be empty. It's a good practice to offer
        // a structured logs (self.logError(...)) for the failed translations.
        return {
          state: 'translated',
          fields: translatedTextArray
        };
      },

      async getSupportedLanguages(req, sourceLanguages, targetLanguages) {
        // `sourceLanguages` and `targetLanguages` are optional arrays of language codes.
        // If they are provided, the method should return information about whether
        // each language is supported as a source or a target respectively.
        // if a requested language is not supported, then the supported flag will be false.

        // The expected return format is:
        return {
          source: [
            { code: 'en', supported: true },
            { code: 'fr', supported: true },
            { code: 'zh', supported: false }
          ],
          target: [
            { code: 'en', supported: true },
            { code: 'fr', supported: true },
            { code: 'zh', supported: true }
          ]
        };
      }
    };
  }
};
- Add your logic to the code above and configure the module in your
app.jsfile:
require('apostrophe')({
  shortName: 'my-project',
  modules: {
    '@apostrophecms-pro/automatic-translation': {
      options: {
        provider: 'my-provider'
      }
    },
    'my-provider': {}
  }
});
💎 Related Pro Extensions
Maximize your global content strategy with these complementary ApostropheCMS Pro modules:
🔍 SEO Assistant
AI-powered meta title and description generation that works with your translated content to optimize search rankings across all languages.
📄 Import/Export Translations
Seamlessly integrate with professional translation services by exporting content for human review and importing polished translations back into your CMS.
🎨 Palette Design Tools
Customize your multilingual sites with visual design tools that maintain brand consistency across all language versions.
Create an account on Apostrophe Workspaces or contact us to learn more about Pro features and build a complete global content management solution.
🏢 Managing Multiple International Sites?
Scaling content across multiple countries and languages? Consider ApostropheCMS Assembly for enterprise multisite management:
✨ Assembly Global Features
- 🌍 Multi-Region Deployment: Deploy sites across different geographic regions for optimal performance
- 🏗️ Centralized Translation Management: Coordinate translation workflows across your entire site network
- 🚀 Shared Content Libraries: Reuse translated assets and content across multiple international sites
- ⚙️ Per-Site Language Configuration: Different language sets and translation providers per site
- 📊 Global Analytics: Track content performance and translation effectiveness across regions
- 🎨 Regional Customization: Adapt designs and content for local markets while maintaining brand consistency
Perfect for international organizations, global brands, or agencies managing content across multiple markets and languages.
Learn more about Assembly or contact our team to discuss your global content strategy.
Made with ❤️ by the ApostropheCMS team. Found this useful? Give us a star on GitHub! ⭐