Extensions & Integrations
Advanced Permission
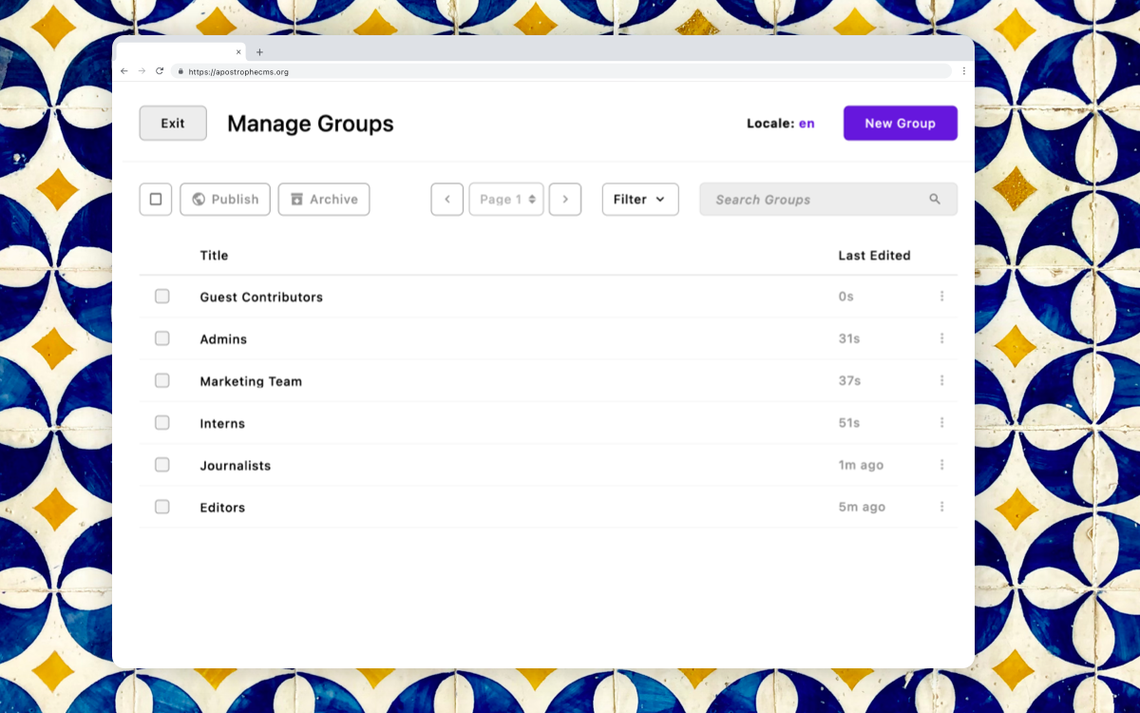
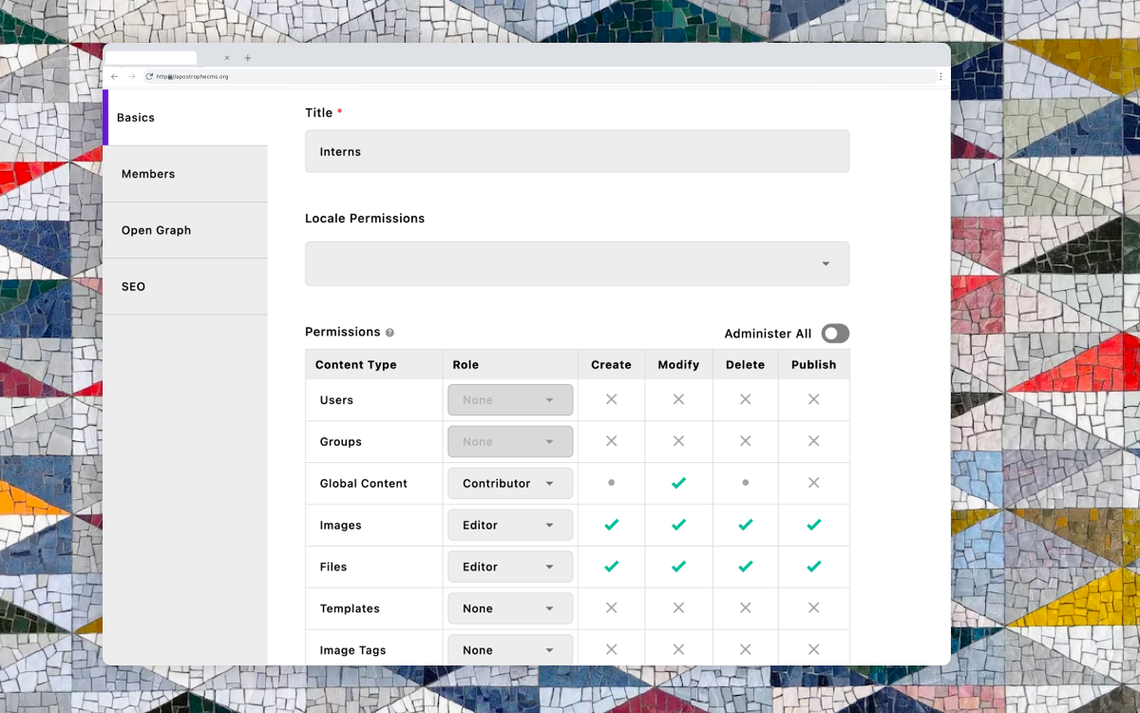
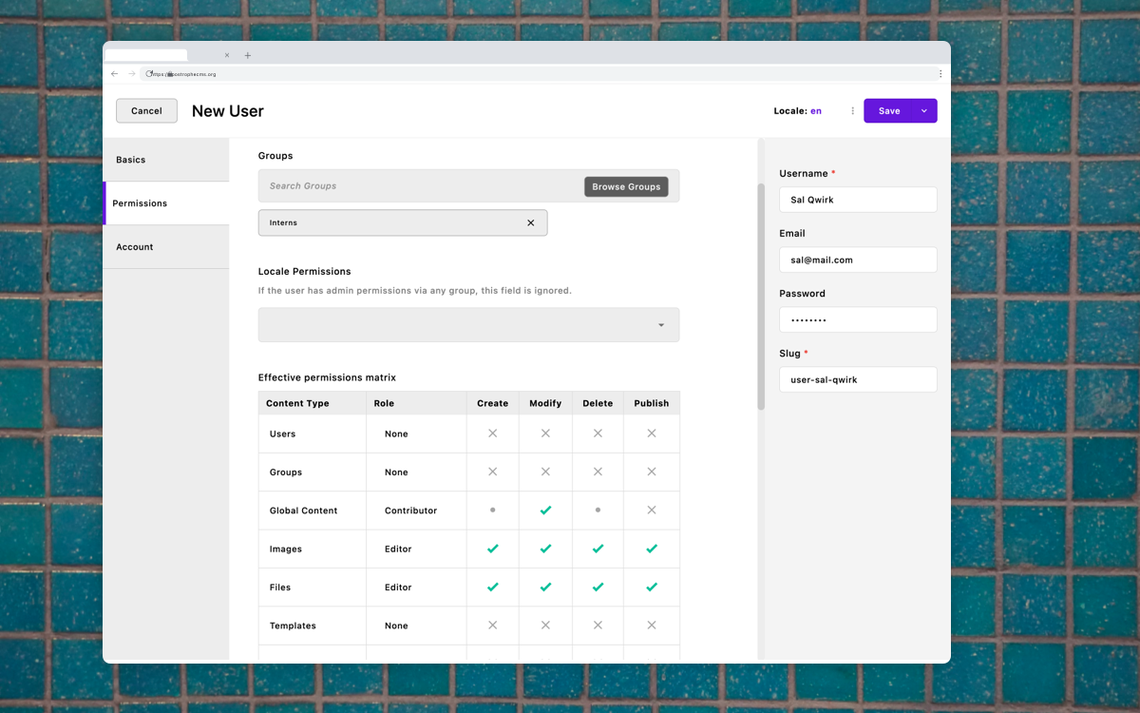
Keep your content secure with granular access control—designed to scale with your team and workflows. Create custom user groups, manage granular permissions, and control who can access specific content - perfect for organizations managing complex editorial workflows and sensitive content.
Why Advanced Permission?
- 🛡️ Enterprise-Grade Security: Granular control over who can access, edit, and publish content
- 👥 Flexible Team Management: Create custom groups with specific permissions for different roles
- 🌍 Multi-Locale Ready: Manage permissions across languages and regions
- 📄 Document-Level Control: Set permissions on individual pages and pieces
- ⚡ Seamless Workflow Integration: Works with your existing editorial process without disruption
- 🎯 Field-Level Security: Control access to specific form fields with custom permissions
Installation
Note: This module requires an ApostropheCMS Pro license. Don't have Pro yet? Create an account on Apostrophe Workspaces or contact us and get started with ApostropheCMS Pro to access this and other Pro extensions.
npm install @apostrophecms-pro/advanced-permission
Configure the Advanced Permission modules in your app.js file (or in your index.js files for multisite setups):
import apostrophe from 'apostrophe';

apostrophe({
  root: import.meta,
  shortName: 'my-project',
  modules: {
    '@apostrophecms-pro/advanced-permission-group': {},
    '@apostrophecms-pro/advanced-permission': {}
  }
});
Multisite Configuration
For multisite projects, add these modules to both your site/index.js and dashboard/index.js files to enable advanced permissions across all sites and the dashboard.
Important: If your dashboard currently uses
privateDashboards: true, set this tofalsebefore enabling advanced permissions in the dashboard.
Note: If upgrading from a version that did not include per-locale permissions, please see the important Locale Permissions and Upgrades section below.
Core Features
The typical workflow for this module is to add one or more groups with specific permissions. Then users are assigned to one or more groups. Additional permission can be set on an individual document basis.
Groups
Activating the Advanced Permission module will add a menu to the admin bar for creating new groups. Clicking on this opens a modal that allows the addition of new groups.

Clicking on the "New Group" button will bring up a modal for creating a new group with two settings tabs.
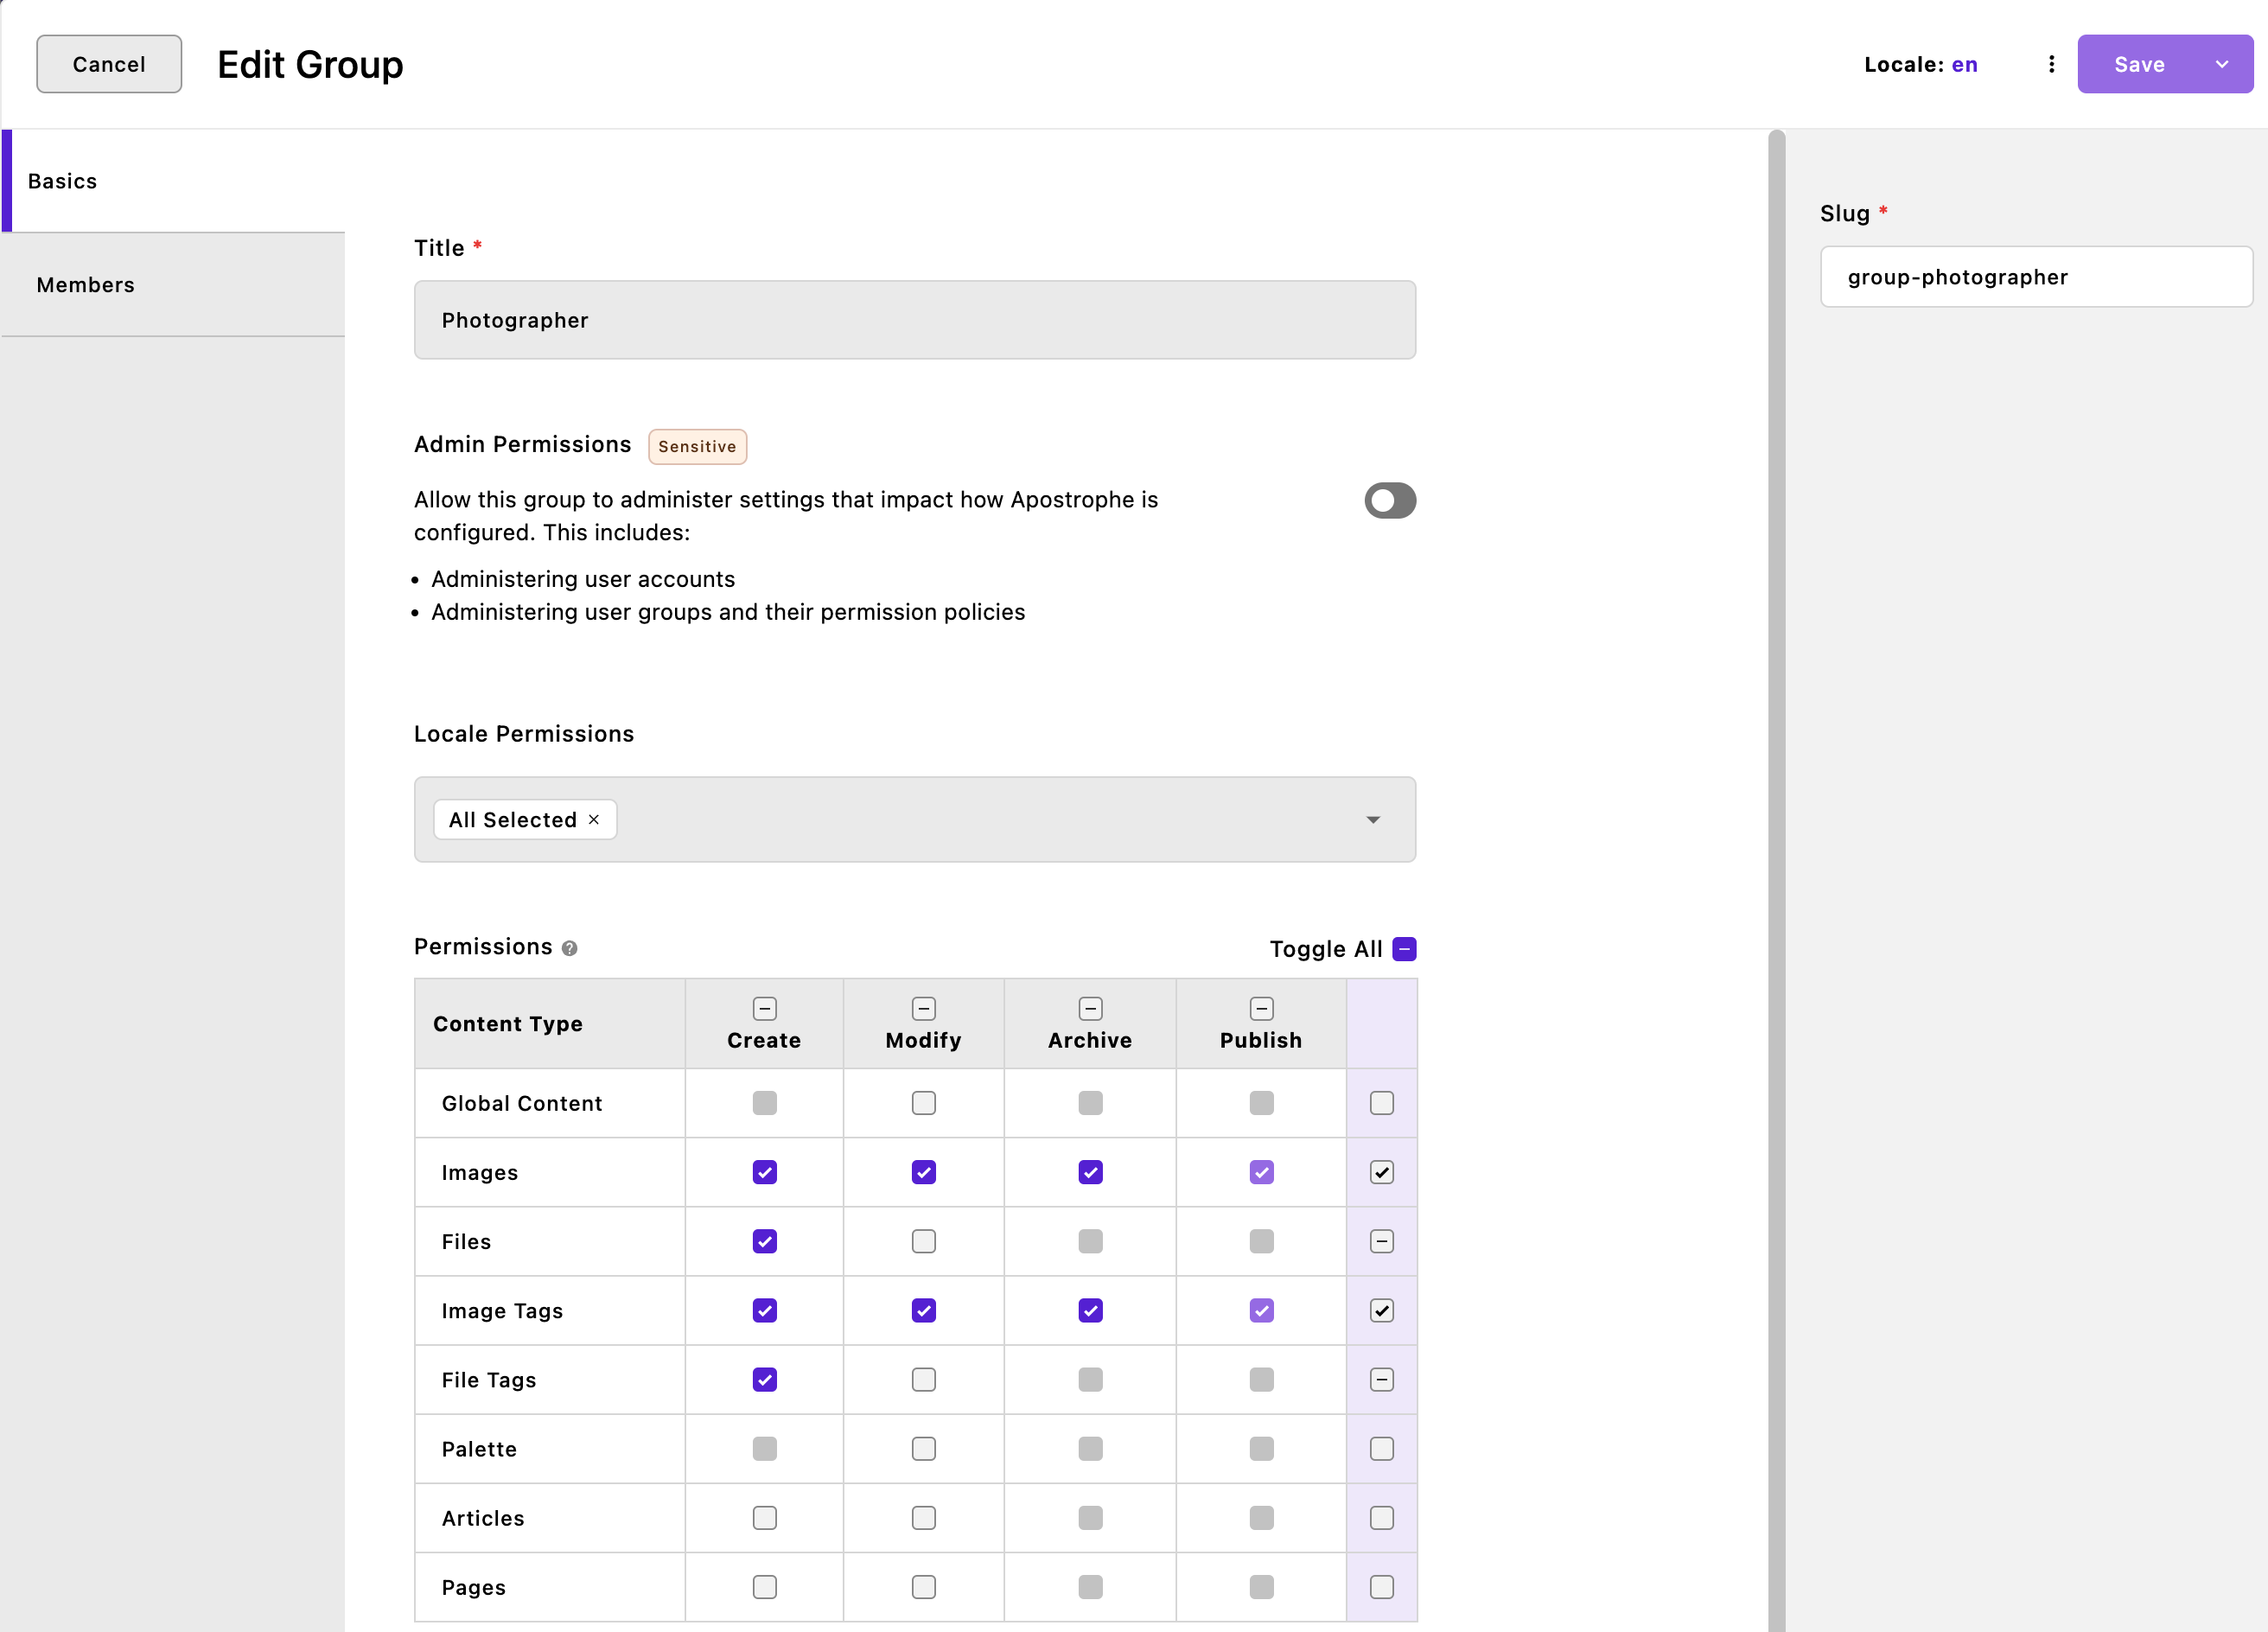
The "Basics" tab has several sections. At the top is a section with a field for the group's unique name in the Title field.
The "Admin Permissions" section contains a toggle that sets whether the group should have all admin permissions. If toggled on it will allow the new group to create, modify, delete, and publish all content on the site, including creating additional users and groups. Only users who are completely trusted to manage other users and their permissions should ever be added to such a group. Note, giving a group admin permissions overrides per-locale permissions. That group will be able to work with documents in any locale and the Locale Permissions section will disappear.
The next section, "Locale Permissions", contains a drop-down that is prepopulated with all of the locales for the site. It allows you to select one or more locales for that group to be given the checked permissions.
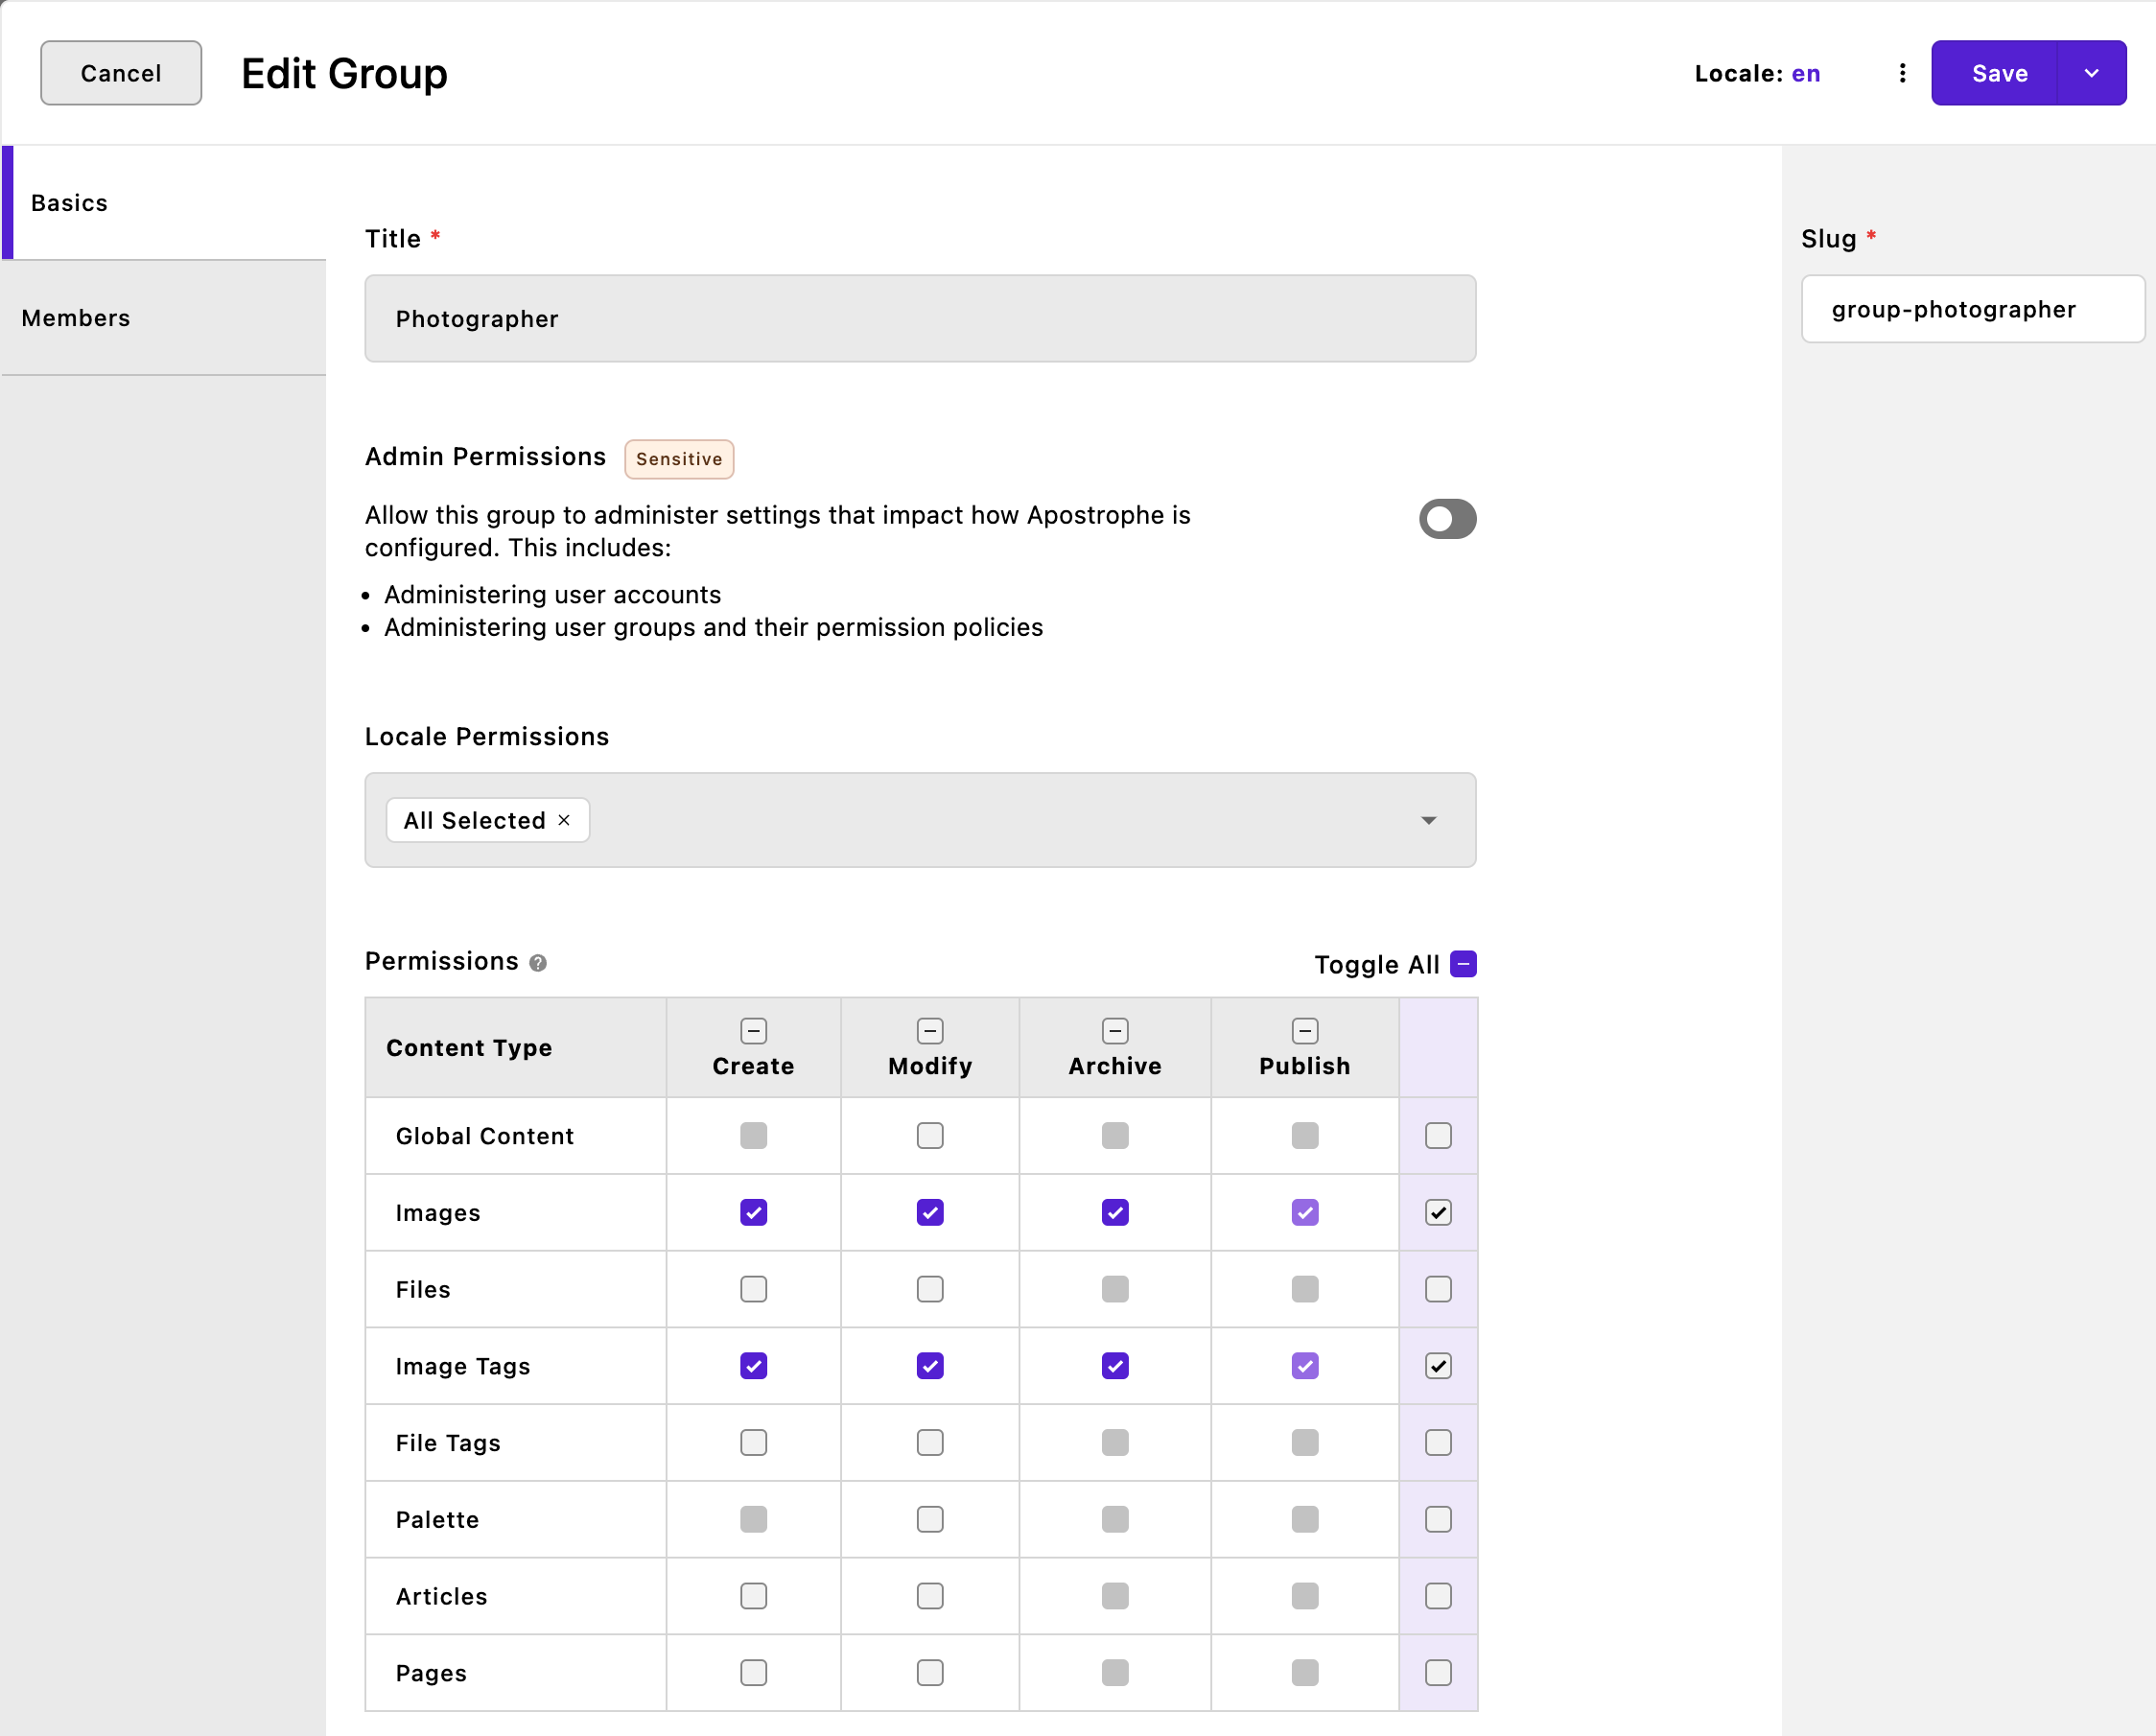
Within the Permissions grid, the left "Content Type" column is prepopulated with all the categories of content that can have permissions applied. This will be project-specific and includes pages, custom piece types, and attachments. Permissions for each document type are added by checking the boxes to the right of each content type. There are also toggles to add all permissions (except group and user permissions) or an entire column or row of permissions.
The checkboxes can be in one of four states. They can be open, as they are for the "Create" permission for "Pages" in the example, indicating no permission. Checked with a dark purple background if permission is explicitly given for that action, or a light purple background if the permission is implicit, for example, if the document has autopublish: true. This is shown, respectively, for the "Archive" and "Publish" permissions of the "Images" content type. Finally, it can be a solid grey if the document type can not be given that permission, for example, if the document is a singleton or the permission depends on another permission in the grid. This is shown for the "Create" permission for the "Global" content type. Hovering over grayed-out boxes will cause a tooltip with clarification to appear if the permission is dependent on another permission in the grid.
Giving a "Create" permission for a content type will also allow a member of the group to edit, submit a draft, and delete any drafts of their own content. However, they will not be able to modify any other user's content, even if they are part of the same group. You need to give "Modify" permission to allow this.

The second tab in this section is the "Members" tab. This tab lists the "Title" and "Username" of all users who are members of the group. Additionally, it lists all groups of which that particular user is a member.
Users

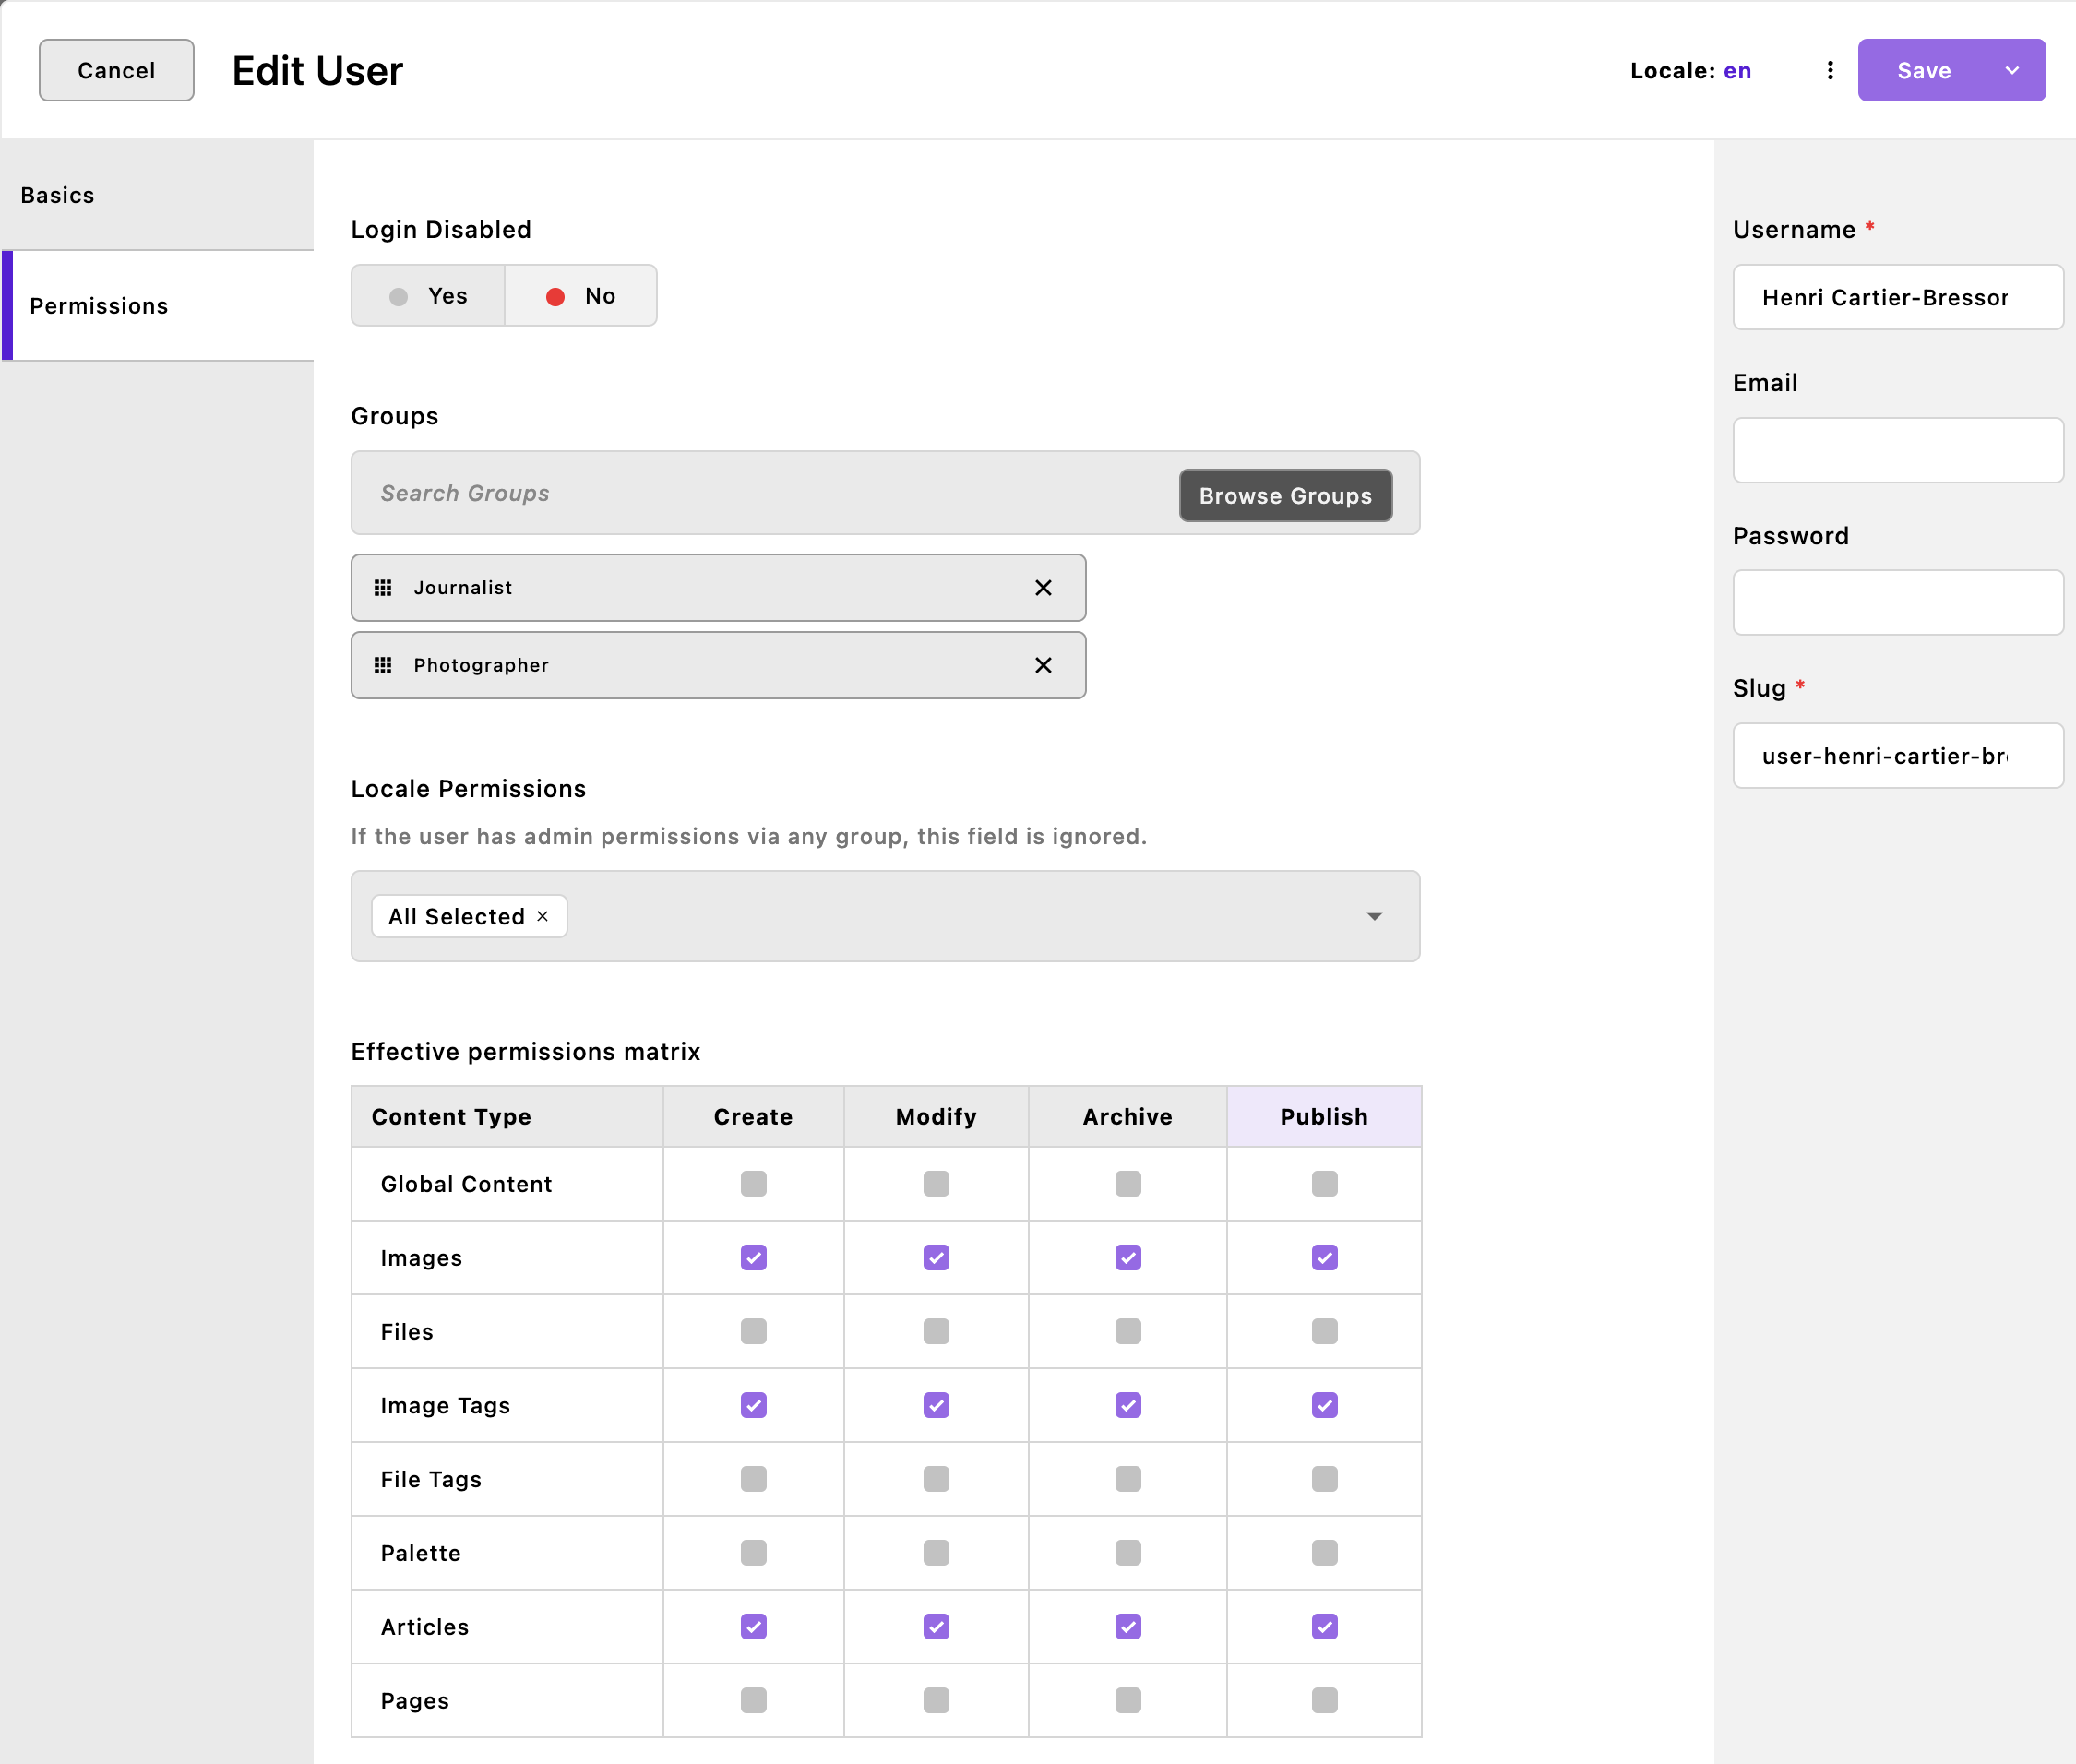
Activating this module will also alter the "Users" modal. In the permissions tab, there will now be four sections. The top-most is a toggle that disables site log-in for the user.
The second section allows for selecting groups created through the "Groups" menu. Each user can have any number of groups assigned. These permissions are additive.
The third section enables the selection of additional locales not already included at the group level. These locales are cumulative. For instance, if one group permits modifying the article piece-type in the English locale, and another grants rights to edit Pages in the French locale, adding those two groups will allow the user to edit both those document types in both locales. Adding a user-level locale extends these effective permissions to the new locale.
If a user has permission to perform at least one action, even if only on a per-document basis, for a certain document type in one locale, they will be able to see but not edit that type in other locales. They will have permission to localize that document to the locale where they do have permission. If there is associated content that the user doesn't have permissions for it will not be localized.
The final section displays the effective permissions matrix resulting from the groups that are applied to the user.
Usage Workflows
Creating Editorial Teams
Example: Photography and Journalism Workflow
Create specialized groups for different editorial roles:
Photographer Group: Controls image assets
- Create, modify, and publish images
- Manage image tags and metadata
- No access to articles or pages
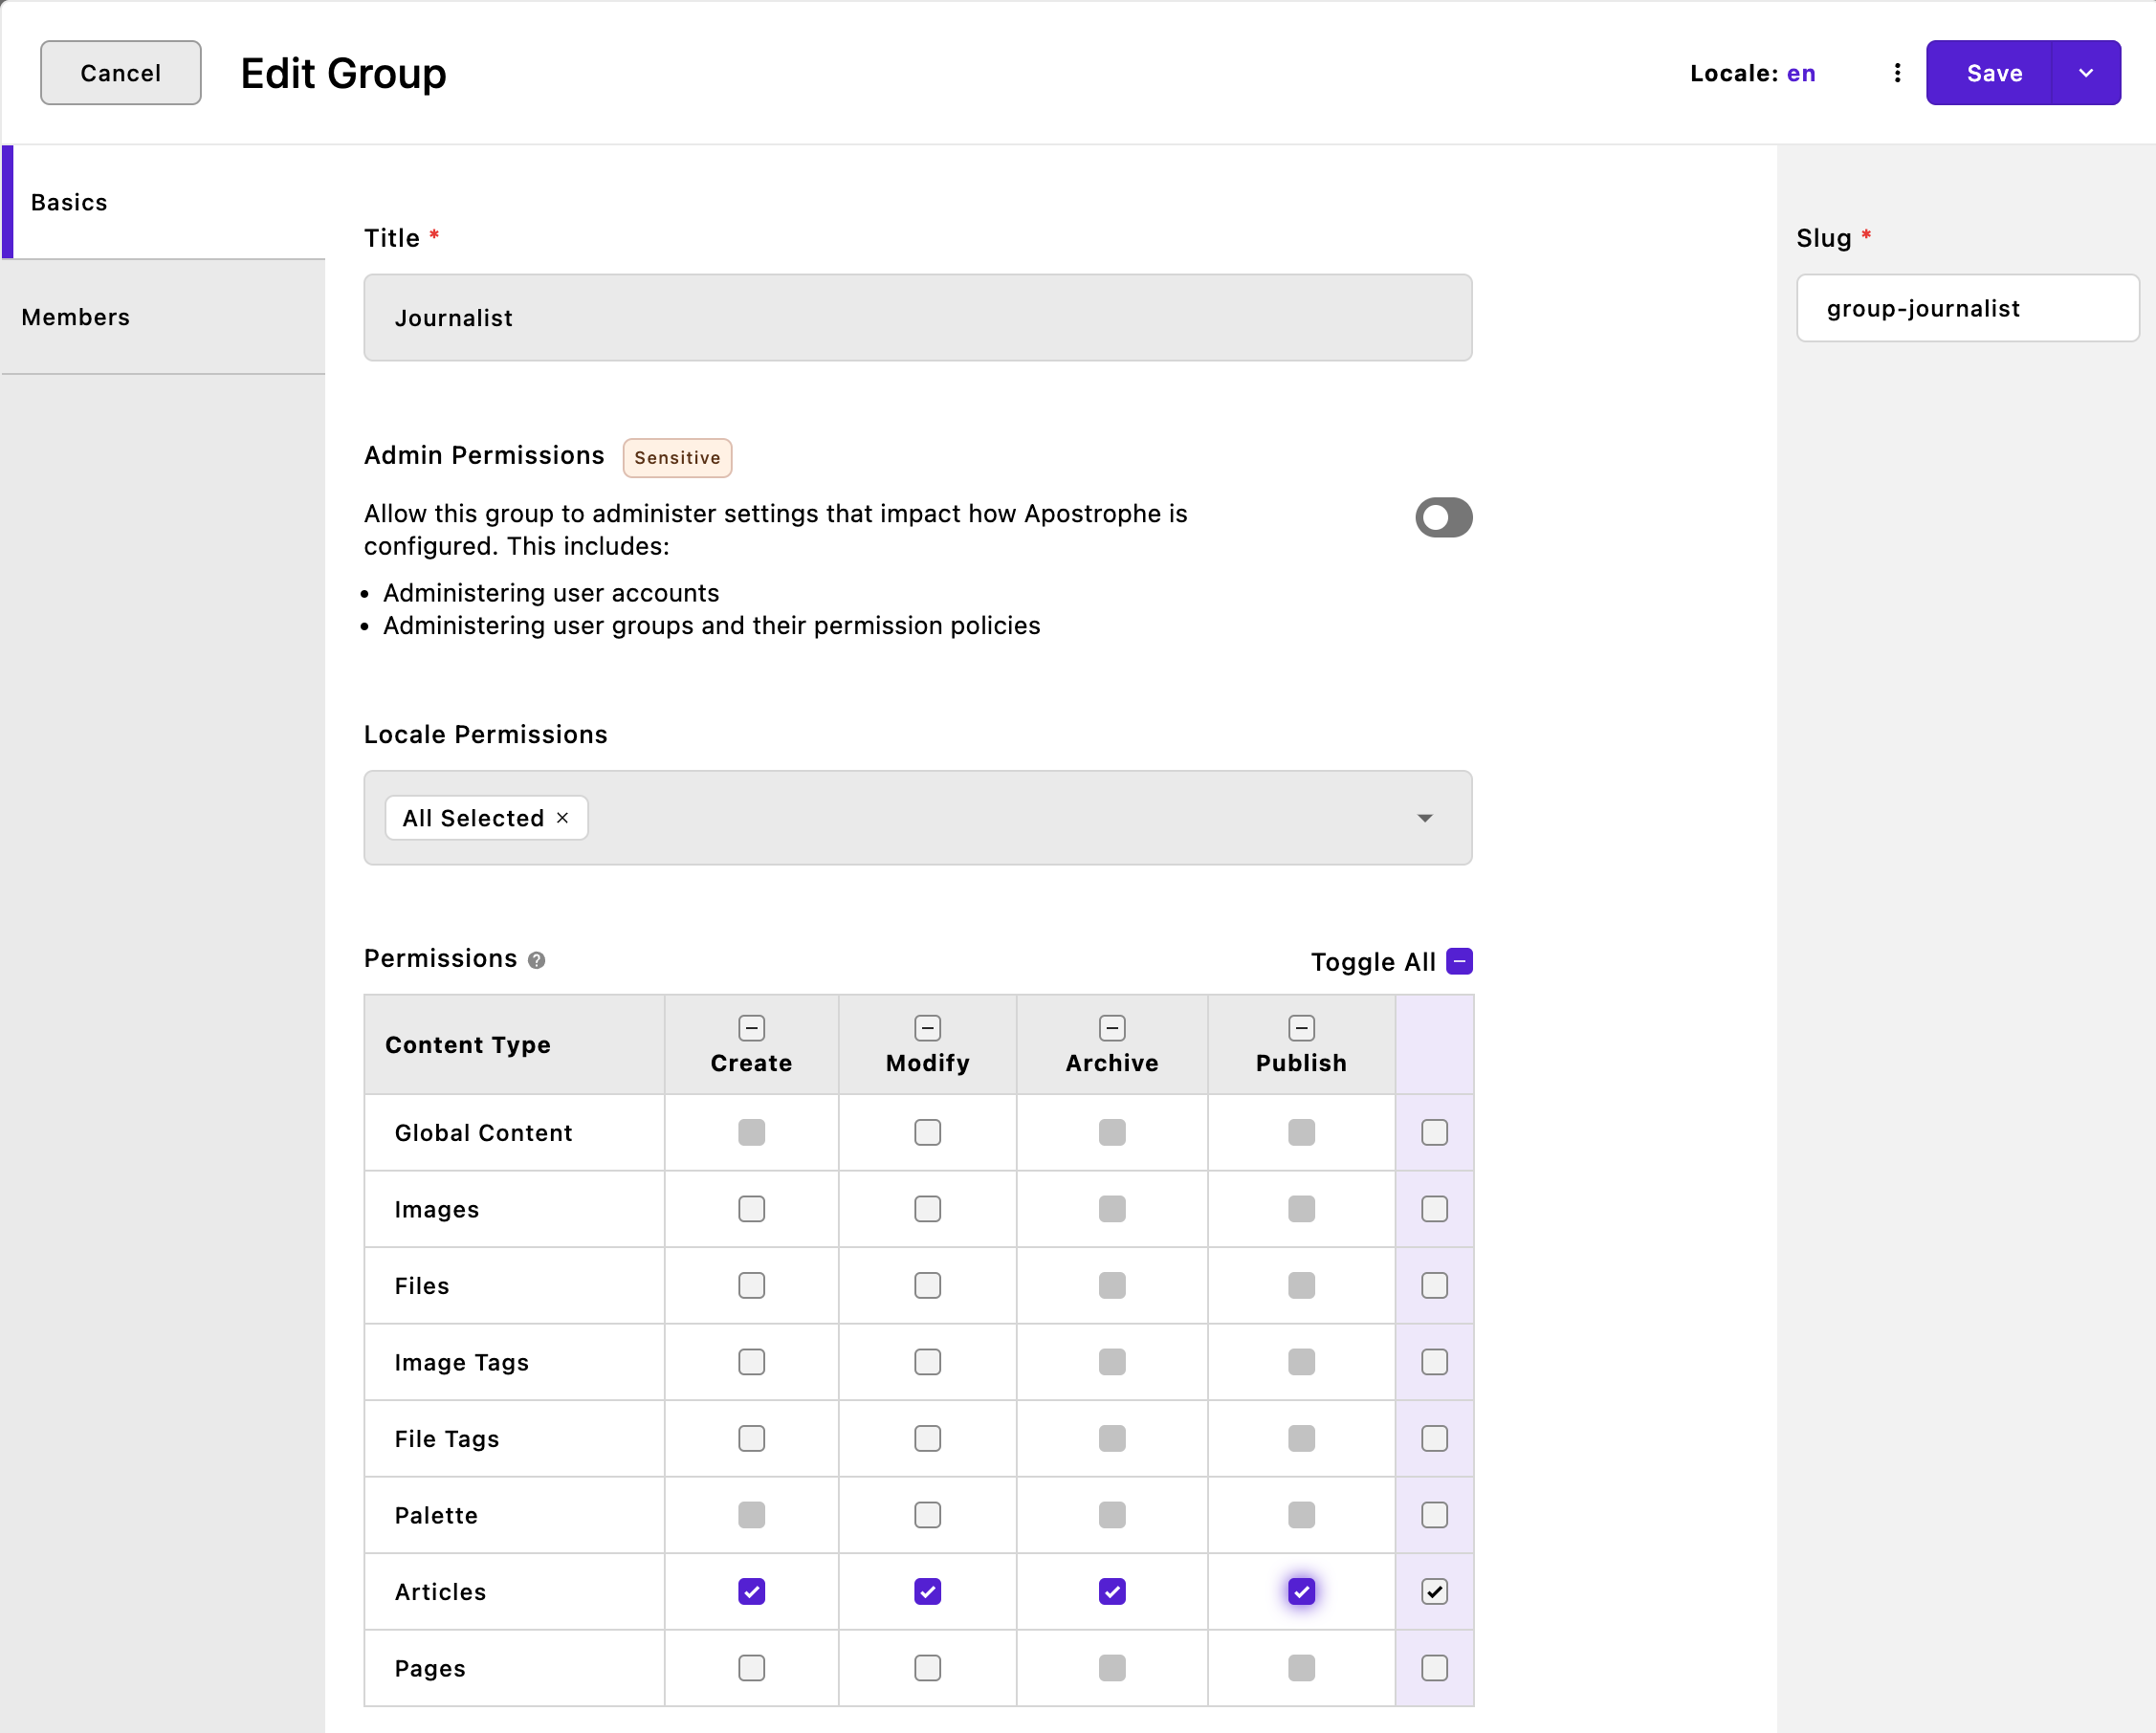
Journalist Group: Manages article content
- Create, modify, and publish articles
- Access to published images for article creation
- No direct image upload permissions
Photojournalist User: Combines both roles
- Assign both groups to users who need full editorial control
- Additive permissions from both groups
Per-document permission
The Advanced Permission module also allows admins to set the permissions for specific pages and pieces, rather than whole categories of page- or piece-types. The permissions tab in these cases is located in the editing modal for the individual document. Any permissions added in the per-document permissions apply to all locales for that page or piece.
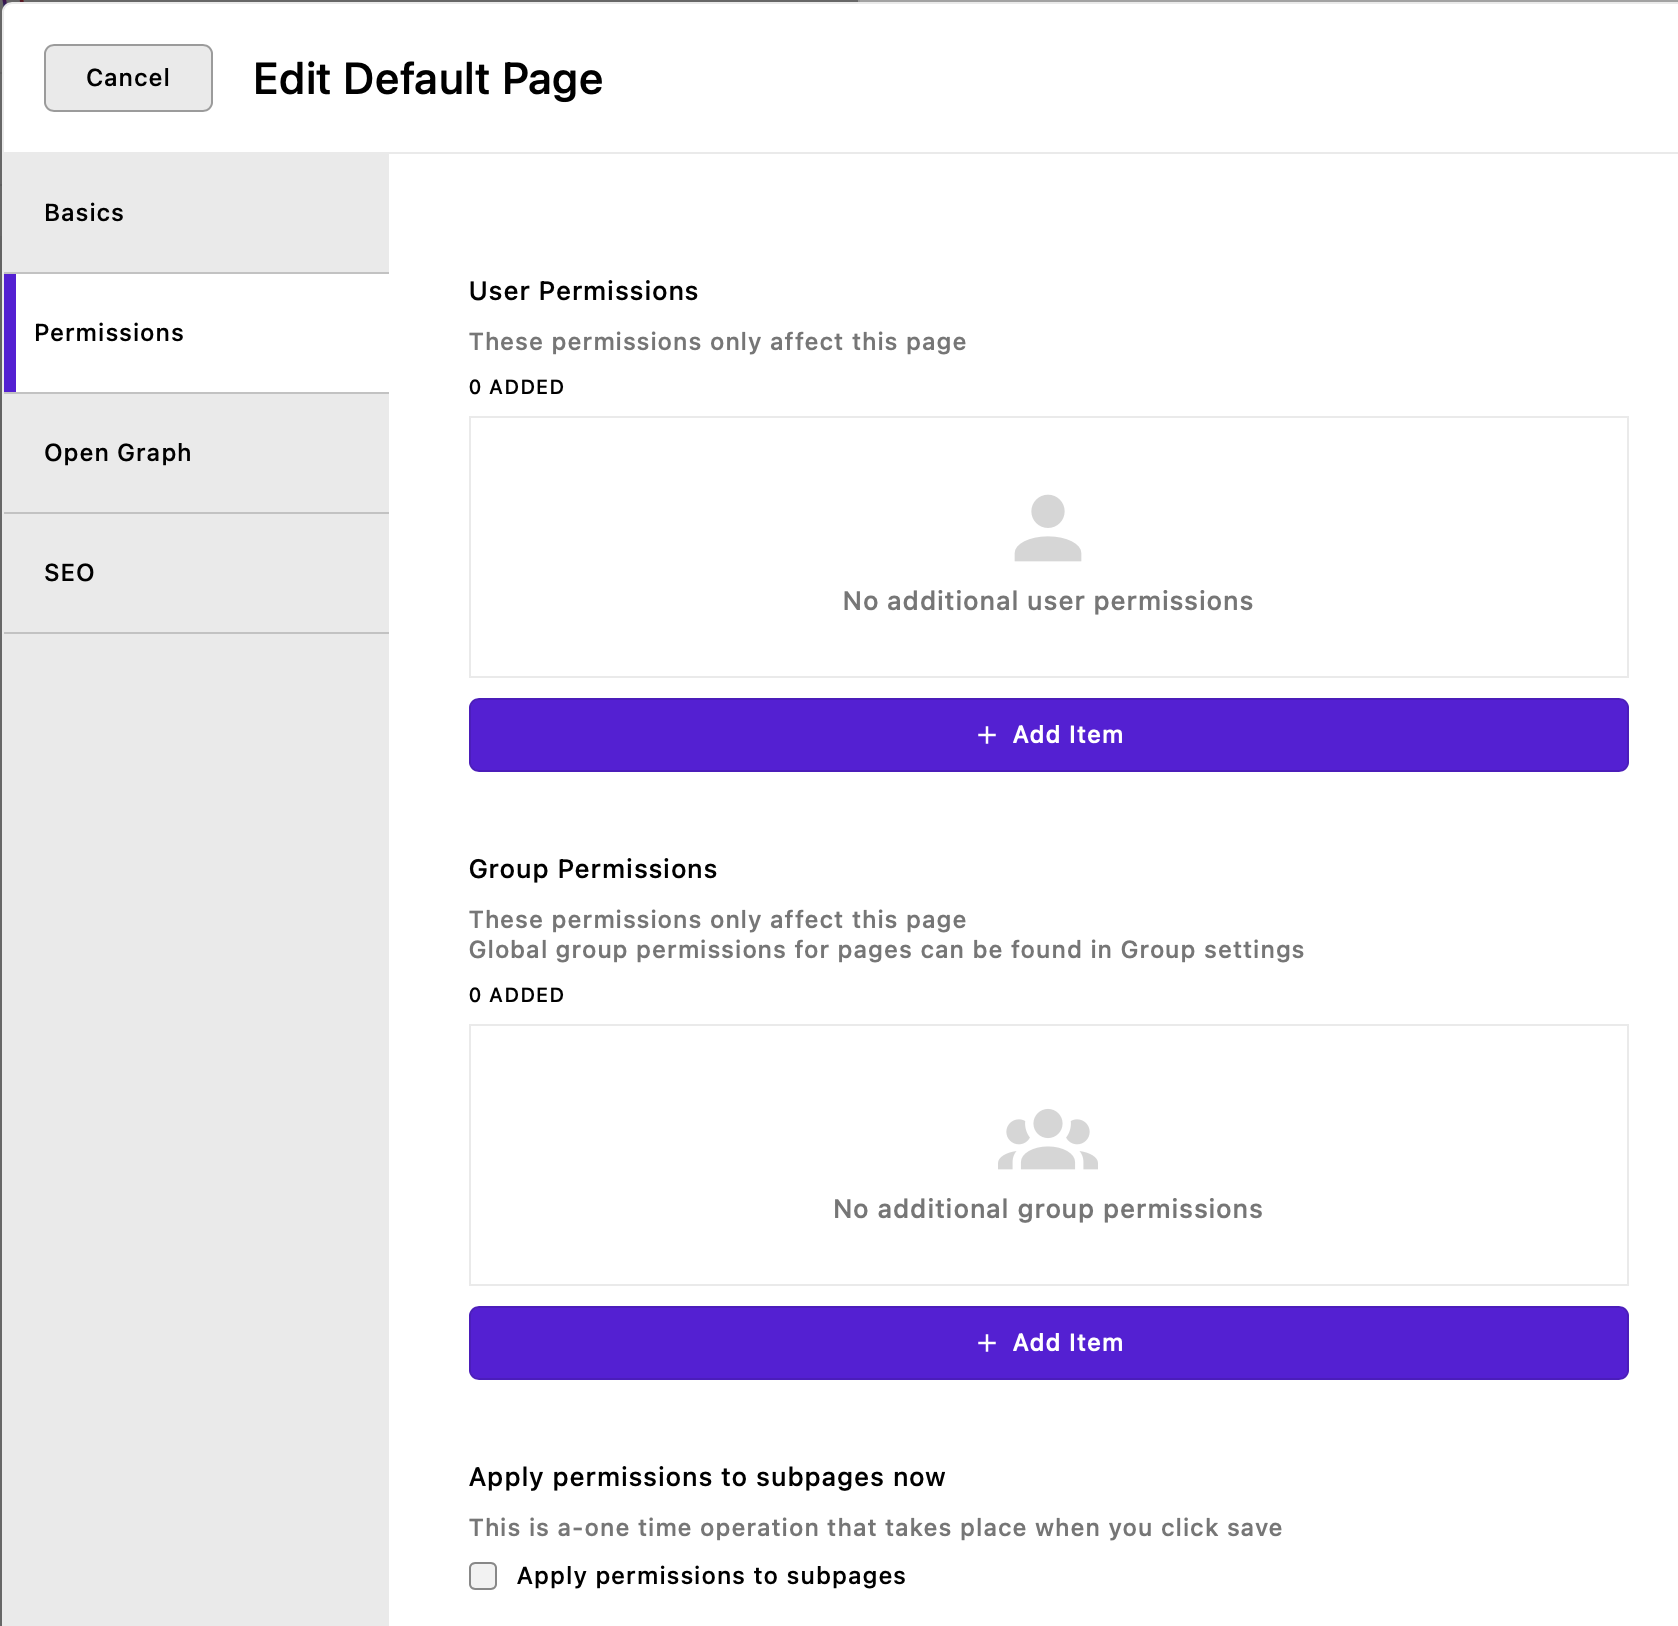
This image shows the 'Permissions' tab for a page created with the default template. Editing the permissions here WILL NOT give the selected user(s) permission to edit all pages made with the default page-type template, only permission for this specific page. If you want the user to move a page in the tree, they must have general page "create" permission. It isn't sufficient to give them per-document permission. However, a user with at least "create" permission for any page can restore any archived page, even if they don't have any per-document permission for the archived page.
User Permissions

The per-document permissions tab is broken into two sections for pieces and three sections for pages. The top section allows the selection of individual users. Adding an item will cause two input fields and a matrix showing the impact of the selections to appear. Clicking in the first field will bring up a selection list populated with a list of users. Depending on how many users your site has, this might include all users or just a selection of them. If the desired user doesn't appear on the list, typing in the input field at the top of the list will refine the list.
The second input field allows you to add "Modify", "Archive", and "Publish" permissions for the user. To remove permissions from a user, click the trashcan icon to the right of the user's row.
Permissions added through the per-doc permissions panel do not overrule permissions given through the user permissions. If a user has "Publish" permission for all pages at the user level, setting their permission to only include "Create" and "Modify" on a specific page will not remove their ability to publish that page. This will not be reflected in the matrix of permissions within the per-document permission panel.
Group Permissions

The second section of the permissions tab is structured almost identically to the top section, with the first input field showing a list of groups created by the Groups Manager, rather than individual users. Again, each group can be assigned "Modify", "Archive", and "Publish" permissions.
Like the User Permissions, the Group Permissions will not override permissions given to the Group in the Group Manager.
Apply Permissions

The bottom section of the permissions tab only appears when you are setting the permissions for a page-type document. When this box is checked, permissions are copied to the subpages on a one-time basis. They may then be edited on the individual page level. If any permissions are subsequently changed that you want to be extended to all subpages, such as removing permissions from a user, you must click this box again before saving. Otherwise, the change in permissions will only apply to the current document. Changes made within the permissions tab of a subpage will be discarded if the parent page permissions are applied to all subpages.
Advanced Features
Adding New Permission Types
In addition to the core permissions, you can create custom permissions using the top-level permissions object of any module. This allows for selection of the new permission for that document type. New permissions can be added for multiple document types by configuring an ApostropheCMS core module at project-level. For example, adding the permissions object to the @apostrophecms/piece-type module adds the permission to all pieces.
Much like the fields object, this object takes an add property which contains an object of the named custom permission objects. Each new permission object is named for the new permission and can take three properties:
Permission Configuration Options:
label: Determines what is shown at the top of the group or per-document permission managerrequires(optional): Makes this permission dependent on another permission in the grid. For example,requires: 'edit'would require that the admin selects the "Edit" permission before they could select the new permissionperDoc(optional): Boolean, defaults tofalse. If set totrue, allows this permission to be added to individual documents in either the user or group permissions
export default {
  extend: '@apostrophecms/piece-type',
  options: {
    label: 'Product'
  },
  permissions: {
    add: {
      pricingField: {
        label: 'Pricing',
        requires: 'edit',
        perDoc: true
      }
    }
  }
};
Field-Level Security
Once you create your custom permission, it can be used to determine if a user can view and edit a selected field using the editPermission schema field property. This property takes an action and a type:
action: Should be set to one of the built-in permissions, likecreate, or any custom permission that you createtype: Should be set to the module that permission is associated with. For core modules make sure to prefix the module name with@apostrophecms/or@apostrophecms-pro/
fields: {
  add: {
    productPrice: {
      type: 'float',
      label: 'Product Price',
      editPermission: {
        action: 'pricingField',
        type: 'product'
      }
    }
  }
}
Only users with the pricingField permission can edit the price field.
Programmatic Permission Checks
Check permissions in your custom routes and methods:
// Check if user has custom permission
if (self.apos.permission.can(req, 'pricingField', doc)) {
  // User has permission
}
Field-Level Security Limitations
perDoc: truecompatibility: TheeditPermissionfeature is not compatible withperDoc: true. Instead, grant the user per-document permission to "modify" the document, and then use group membership to grant custom permissions that are checked by aneditPermissionproperty
Migration and Setup
Automatic Migration
When activating Advanced Permission on an existing project:
- Group Creation: Automatically creates groups for each existing user role
- User Assignment: Assigns users to groups based on their current role
- Permission Preservation: Maintains existing access levels
Fresh Installation
For new projects, create your first admin group and user:
# Create admin group
node app @apostrophecms-pro/advanced-permission-group:add-admin admin

# Create admin user
node app @apostrophecms/user:add admin --group=admin
For multisite projects:
# Create admin group in dashboard
node app @apostrophecms-pro/advanced-permission-group:add-admin admin --site=dashboard

# Create admin user in dashboard
node app @apostrophecms/user:add admin --group=admin --site=dashboard
Important: Locale Permissions and Upgrades
⚠️ Critical: Under two circumstances you will need to take extra steps to set permissions:
- Adding new locales: If you add additional locales to a site with only one locale enabled and the advanced permission module installed
- Upgrading the module: If you upgrade from a version that did not have per-locale permission support
In both cases, all non-admin users and groups will immediately lose their permissions until they are granted access to edit in one or more locales. Admins will still have access and can address this by giving control of one or both locales to appropriate users and groups in the system.
Rollback
If you need to remove Advanced Permission:
# Remove all groups and relations
node app @apostrophecms/permission:rollback-advanced-permission
Then remove the modules from your app.js:
import apostrophe from 'apostrophe';

apostrophe({
  root: import.meta,
  shortName: 'my-project',
  modules: {
    // Remove these lines:
    // '@apostrophecms-pro/advanced-permission-group': {},
    // '@apostrophecms-pro/advanced-permission': {}
  }
});
Limitations
- Field-Level Permissions: The
editPermissionfeature is not compatible withperDoc: true. Use document-level modify permissions combined with group membership for field-level control - Permission Overrides: Per-document permissions cannot remove permissions granted at the user or group level
- Admin Override: Users with admin permissions bypass all locale restrictions
Made with ❤️ by the ApostropheCMS team. Need enterprise security? Create an account on Apostrophe Workspaces or contact us about ApostropheCMS Pro! 🔐

