
The ApostropheCMS blog module (@apostrophecms/blog) is a free, officially supported extension that adds a complete blogging system to your site — including a post content type, a listing page with date-based filtering, and tags. It's installed and configured by your development team, and what you see in the CMS reflects the choices they made when setting it up for your project.
Guide to blogs in ApostropheCMS
A practical editor's guide to creating, publishing, and managing blog posts with ApostropheCMS.
-
- Beginner
- 10 min read
- Managing Pro and Assembly Extensions
- Content Management
- Content Creation
- Last Updated August 4, 2026
What you'll learn
-
What the ApostropheCMS blog module includes and how it's structured
-
How to create a blog post and fill in its fields
-
How the publication date controls post visibility and why it's not the same as publishing
-
How to use categories to organize your content
-
How publishing, updating, and deleting posts works
-
What your development team controls and when to ask them for help
What is the ApostropheCMS blog module?
The ApostropheCMS blog module (@apostrophecms/blog) is an extension that gives editors a structured, flexible way to publish articles, announcements, and other long-form content. Once installed by your development team, it adds a blog post content type, a listing page with date-based filtering, and a tagging system, all integrated with ApostropheCMS's standard draft/publish workflow.
This guide covers everything you need to know as an editor: creating and publishing posts, understanding how the publication date controls visibility, managing tags, and knowing which parts of the blog are configured by your development team versus controlled by you.
What's included in the blog module?
The blog module gives you everything you need to start publishing. Out of the box, it includes:
- Blog posts — the core content type, with a title, slug, publication date, body content area, tags, and meta description
- Blog index page — a listing page that automatically displays your published posts and supports date-based filtering by year, month, or day
- Tags — a lightweight system for organizing and filtering posts by topic
- Draft/publish workflow — full support for ApostropheCMS document states, so posts can be prepared in advance and reviewed before going live
Your development team may have extended any of these — adding fields like author or featured image, changing the URL structure, or building custom widgets for the post body. What you see in your CMS reflects those choices. When in doubt about a field you don't recognize, ask your developer.
How do I create a blog post?

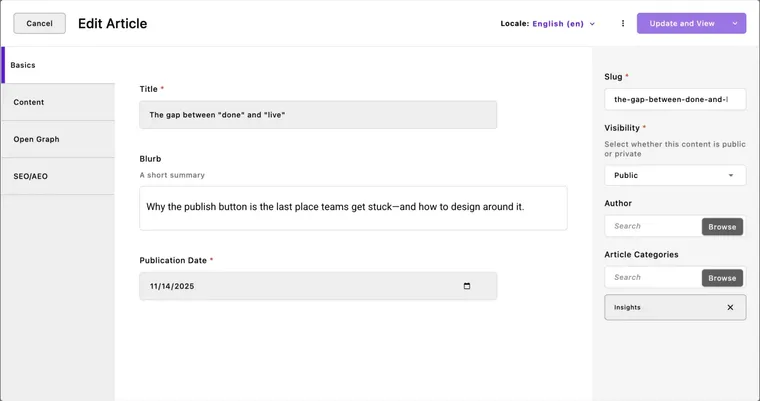
Give your post a Title. This becomes the page heading and is used to generate the URL slug. You can edit the slug manually if needed.
Fill in the body content area using the available widgets — rich text, images, video, and any custom widgets your team has configured. This is your article body. See the Editor guide: Working with Widgets if you're unfamiliar with how widgets work.
Fill in the remaining fields in the sidebar or below the content area (see the next section for a full field reference).
When you're ready, save your work using Save Draft or publish it (see the publishing section below).
What fields does a blog post have?
These are the fields the blog module includes by default. Your development team may have added fields like author, featured image, or related posts, or removed fields that don't apply to your project.
Field | What it's for |
|---|---|
Title | The post headline. Used as the page heading and to generate the URL slug. |
Slug | The URL path for this post — auto-generated from the title, but editable. |
Publication date | Controls when the post becomes publicly visible. Posts with a future publication date are not shown to visitors even if published. See below for details. |
Body | The main content area, built from widgets. |
Meta description | A short summary used in search results and social sharing previews. See the Editor guide: Working with SEO tools for best practices. |
Tags | One or more topic tags for organizing the post. See the next section for how tags work. |
How the publication date controls visibility


The publication date field does two things that are easy to confuse:
It controls the display date shown on the post and index page
It controls public visibility — posts with a publication date in the future are not shown to site visitors, even if the post is in a published state in the CMS
This means you can publish a post in advance and set a future publication date to hold it from public view until the right moment. Once that date passes, the post becomes visible automatically.
How do I use categories to organize posts?
Categories are the primary way to organize posts by topic. A post can have multiple categories and they can be used to filter the blog index — depending on how your site is configured.
To add a category to a post:
Open the post for editing and find the Categories field.
Start typing a topic name. If the category already exists, select it from the dropdown.
If it's new, click on the browse button to be taken to the categories editor to create a new one.

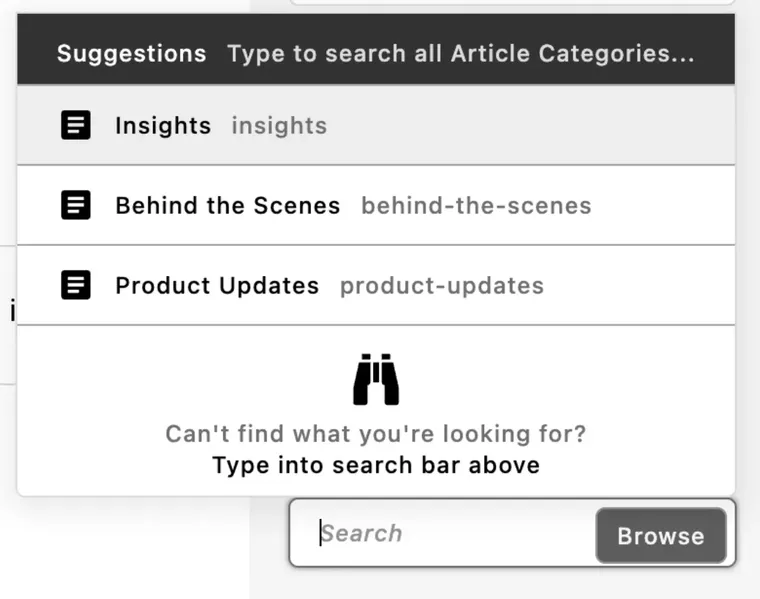
A few tips for keeping categories useful:
Keep categories broad enough to be reusable across many posts. Product Updates, Tutorials, and Case Studies will serve you better than highly specific one-off categories.
Avoid near-duplicate categories with slightly different names. Tutorial and Tutorials are the same thing to a reader but two different categories in the CMS — pick one form and stick with it.
Categories may power filtering on your blog index, so inconsistency can affect how readers navigate your content.
How does publishing work for blog posts?
Blog posts in ApostropheCMS follow the standard document workflow. Understanding the three states helps you know exactly what visitors can and can't see at any point.
State | What it means |
|---|---|
Draft | The post exists in the CMS but is not visible to site visitors. |
Published | The post has been published. It is publicly visible if its publication date is in the past. |
Pending updates | The post has been published, but you have saved edits that haven't been pushed live yet. Visitors still see the last published version. |
To publish a post
Open the post and confirm it's ready.
Click Publish in the editor toolbar. You may need to open the dropdown menu to select the Publish action before clicking.
The post is now published. If its publication date is today or in the past, it's immediately visible to visitors.
To unpublish a post
Open the post, use the action menu, and revert it to draft. The post will no longer appear to visitors, but it remains in the CMS and can be republished at any time.

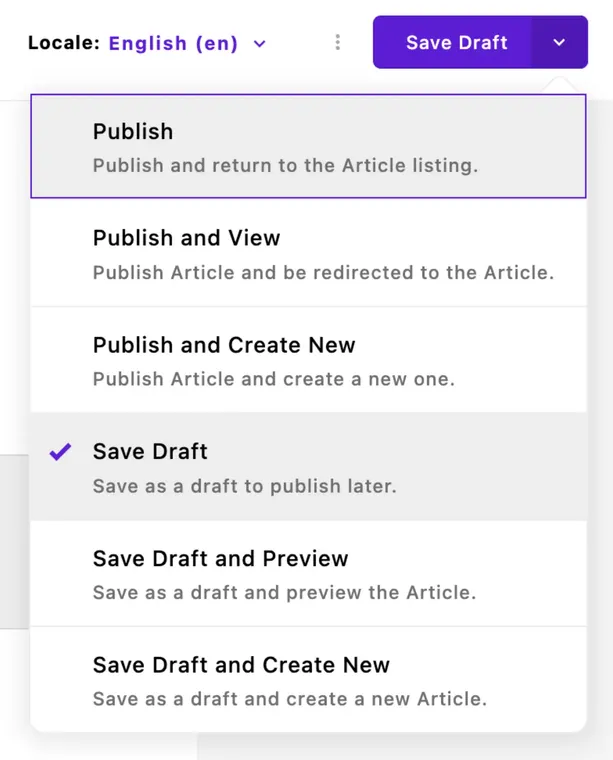
How do I edit or update a published post?
Find the post via the Blog manager in the admin bar, or navigate to it on the live site while logged in and click Edit.
Open it for editing. The post enters a Pending updates state — your edits are saved as a draft, but the live site continues to show the last published version.
Make your changes and click Update to push the updated version live. You may need to open the dropdown menu to select the Update action before clicking.
This means you can work on revisions to a live post without taking it offline or showing incomplete work to visitors. The published version stays intact until you're ready to update it.
How do I delete a blog post?
- Find the post in the Blog manager or navigate to it on your site.
- Open the action menu (the three dots) and select "Archive" or "Delete", depending on your site's configuration.
- Confirm the action.
What can my development team customize?
Your development team can extend the blog module in several ways, and on many projects they already have. Here are some common customizations editors encounter or request:
Adding fields to posts (e.g., author, featured image, related posts)
Changing the URL structure for posts or the index page
Adding new widget types to the post body
Adjusting how categories display or filter on the index
Renaming "Blog" to something like "Articles" or "News"
Creating multiple blog types for different content (e.g., a separate News section)
Does my site use static site generation?
If your site uses a static site generator or a decoupled frontend — whether that's Astro, Next.js, Nuxt, or another framework — publishing behavior may work differently from what's described in this guide. On a statically generated site, a rebuild may be required before published content appears publicly, even after you click Publish in the CMS.
Ask your development team how publishing and build triggers work on your specific site. They can tell you whether posts appear immediately, on a schedule, or after a manual build step.
Common questions
The blog module is an optional extension that needs to be installed separately. If it's not in your admin bar, it may not be installed, or your development team may have renamed it — "Articles" and "News" are common alternatives. Your site may also have multiple blog types set up under different names. When in doubt, ask your developer.
They control two different things. Publishing moves a post out of draft state and makes it live in the CMS. The publication date controls when that published post becomes visible to site visitors — a future date holds it from public view even after publishing, and once the date arrives, the post appears automatically.
Two things to check. First, confirm the publication date isn't set to a future date — that will hold the post from public view even after publishing. Second, if your site uses static site generation, a site rebuild may be required before the post appears. Ask your development team which applies to your setup.
The publication date field will make a post visible automatically when its date arrives, but only if the post is already in a published state. For scheduling the actual publish action on a draft, the @apostrophecms/scheduled-publishing extension handles that. If you don't see a scheduling option in your editor, ask your development team whether it's installed. See the Editor guide: Editorial workflow for more on scheduled publishing.
Changing the title does not automatically update the slug. The URL path is generated from the title at creation time and stays fixed after that, so if you need to change it, edit the Slug field directly. If the post already has inbound links, ask your development team to set up a redirect from the old URL before you make the change.
The standard blog module uses tags as its only built-in taxonomy. If you need categories, parent/child relationships, or a more structured content hierarchy, that's a customization for your development team. They can also set up multiple separate blog types — for example, a Blog and a News section — if your content needs distinct management and URL structures.
Quick tips to take with you
-
The ApostropheCMS blog module (
@apostrophecms/blog) is an optional extension that adds posts, a listing page with date-based filtering, and tags, installed and configured by your development team. -
Default post fields are Title, Slug, Publication date, Body, Meta description, and Tags. Fields like author and featured image are common additions by your dev team, not defaults.
-
The publication date controls both the display date and public visibility. A published post with a future date is not visible to visitors until that date arrives.
-
Blog posts follow the standard ApostropheCMS draft/publish workflow: Draft means not visible; Published means live (if the publication date is in the past); Pending updates means live with unsaved edits in progress.
-
Tags are the module's built-in taxonomy — keep them broad and consistent.
-
If your site uses static site generation, ask your development team how and when published content goes live.
-
Fields, widgets, URL structure, and taxonomy are all configurable by your development team. If something seems missing, ask them.