Code reuse is one of the fundamental pillars of programming. After spending time defining a UI component, procedure, or function, developers want to reuse what they have built as much as possible. But what about content creation? Editors also invest a lot of time in crafting quality content or devising original layouts. They, too, should have the opportunity to reuse what they create. This is where Apostrophe Template Library comes in!
This powerful Apostrophe Pro module transforms the way editors can approach content creation and design in the digital world. In detail, Template Library allows content creators to create and manage both layout and content templates directly in Apostrophe. The idea behind the module is to create content once and reuse it multiple times with just a few changes.
In this step-by-step tutorial, you will understand what Apostrophe Pro’s Template Library module is, how to set it up, and what it has to offer.
Let's dive in!
What Is the Apostrophe Template Library Module?
The Template Library module is an Apostrophe Pro extension. Its goal is to allow product managers to create and manage reusable templates. Specifically, each template must be related to an existing page type or piece type.
In other words, there are two types of templates supported by the Pro module:
- Page templates: An existing page can become a reusable template that editors can apply to new pages to simplify the design process.
- Piece templates: An existing piece instance can become a reusable template that editors can apply to new pieces to facilitate the creation of new content instances.
Note: @apostrophecms-pro/doc-template-library is the name of the npm package of the Template Library module.
Benefits of the Template Library Extension
The Template Library is a powerful tool that provides a lot of benefits to editors. Take a look at the three most important reasons why you should enable it in your Apostrophe application:
- Enhanced Reusability: Promoting a culture of element reuse is what a templating library is all about. After spending a lot of time designing layouts and creating great content, editors can save them in templates with just a few clicks and reuse them whenever they wish. Just think, “design once and reuse many times!”
- Improved Productivity: The module eliminates the need to start from scratch when defining content or designing new pages. This significantly boosts the productivity of content managers, allowing them to focus more on what matters the most.
- Increased Consistency: Templates ensure that each new page or piece adheres to established style guidelines and design principles. This helps teams maintain a consistent look and feel, which is critical to building excellent user experiences.
Setting Up the Template Library Pro Module in Apostrophe
In this section, you will learn how to integrate Template Library into your Apostrophe project.
Since the Template Library is a Pro module, you first need to join Apostrophe Pro. Keep in mind that the module is also available in Apostrophe Assembly. Check our pricing page to compare our plans and find the solution that best suits you.
You will need an Apostrophe 3+ application to follow the tutorial below. If you do not already have one, read the setup guide in our documentation. Make sure you meet the requirements and then follow the instructions to create an Apostrophe 3+ project.
Time to set up the Template Library module!
Install the Template Library Module
After joining Apostrophe Pro, you will be added to the @apostrophecms-pro npm organization. However, if you npm install Pro modules in your projects directly, you will get the following 404 error: '@apostrophecms-pro/<pro_module_package_name>@*' is not in this registry.
The reason is that you must first authenticate your npm commands. In a development environment, the easiest way to do so is by running the following command: npm login
Press ENTER and the npm login page will automatically open in your browser. Type in your credentials and click the “Sign In” button.
Once logged in, go back to your project. You should see the success message below in your terminal: Logged in on https://registry.npmjs.org/
To keep the session alive, npm will create a global .npmrc configuration file for you containing the line below: //registry.npmjs.org/:_authToken=<YOUR_NPM_ACCESS_TOKEN>
Now, you can add the Template Library module to your project's dependencies with: npm install @apostrophecms-pro/doc-template-library
Behind the scenes, npm will use the authenticated URL seen earlier to download the private package and then install it.
In a production environment, you cannot rely on that approach. The problem is that the global configuration file exposes your npm access token, which should be treated as a secret. Instead, set up a granular token related to @apostrophecms-pro by following the official guide. Then, create a local .npmrc file in the root folder of your project and add the following line to it: //registry.npmjs.org/:_authToken=${NPM_TOKEN}
When running an npm command, the CLI will replace ${NPM_TOKEN} with the value read from the NPM_TOKEN environment variable. Thus, set the NPM_TOKEN env with the command below in the deployment server: export NPM_TOKEN="<YOUR_NPM_GRANULAR_TOKEN>"
Replace <YOUR_NPM_GRANULAR_TOKEN> with the value of your granular access token. The production environment is now allowed to install @apostrophecms-pro/doc-template-library.
Wonderful! It only remains to configure the doc-template-library module in your Apostrophe project.
Enable the Template Library Module in Your Project
As with any other Apostrophe module, you need to enable Template Library in the app.js file. To do so, make sure app.js contains the following lines:
// app.js

require('apostrophe')({
  // the name of your project
  shortName: 'apos-template-library-demo',
  modules: {
    // other modules...

    // enable the doc-template-library module
    '@apostrophecms-pro/doc-template-library': {},
  },
  // remaining configs...
});
Launch the development server, and you should now see a new button “Doc Template Library” in the upper right corner as below:
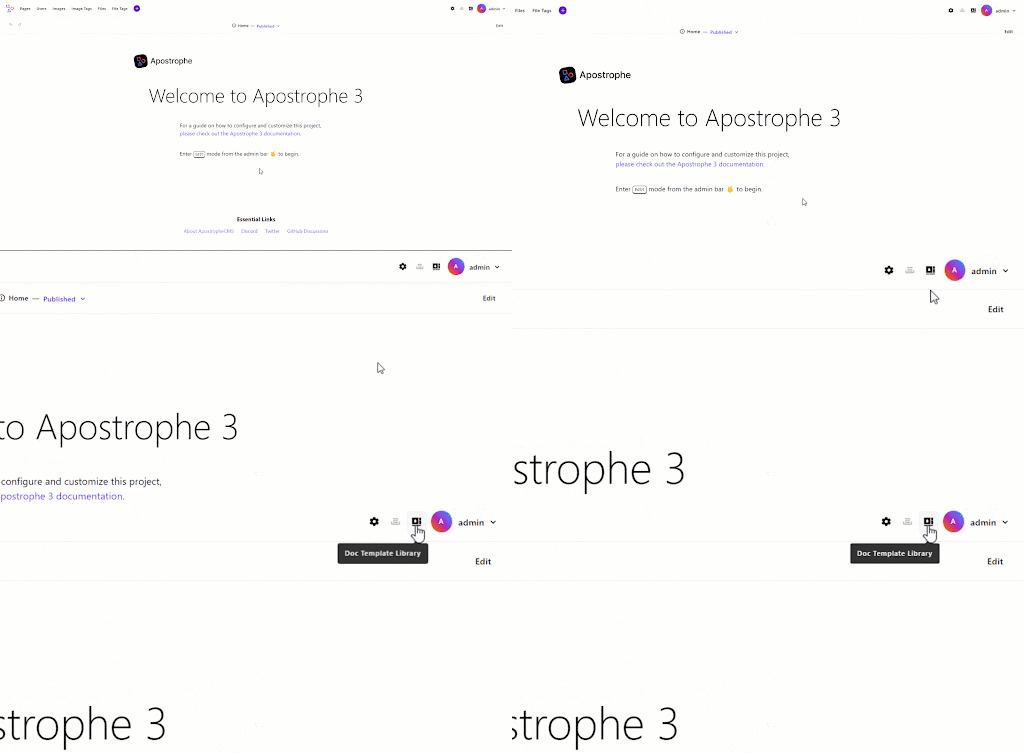
Congrats! You just set up the Template Library Pro module in Apostrophe.
Main Features of Apostrophe's Template Library
Let's explore the features and capabilities offered to editors by the Template Library module. For a more in-depth look, read our article “How to Use Apostrophe's Template Library to Improve Productivity.”
In the example below, we will assume that your Apostrophe application has:
- A single piece type: “Article”
- Three page types: “Default,” “Article index,” and “Home”
Explore Existing Templates
The “Doc Template Library” button opens the following modal:
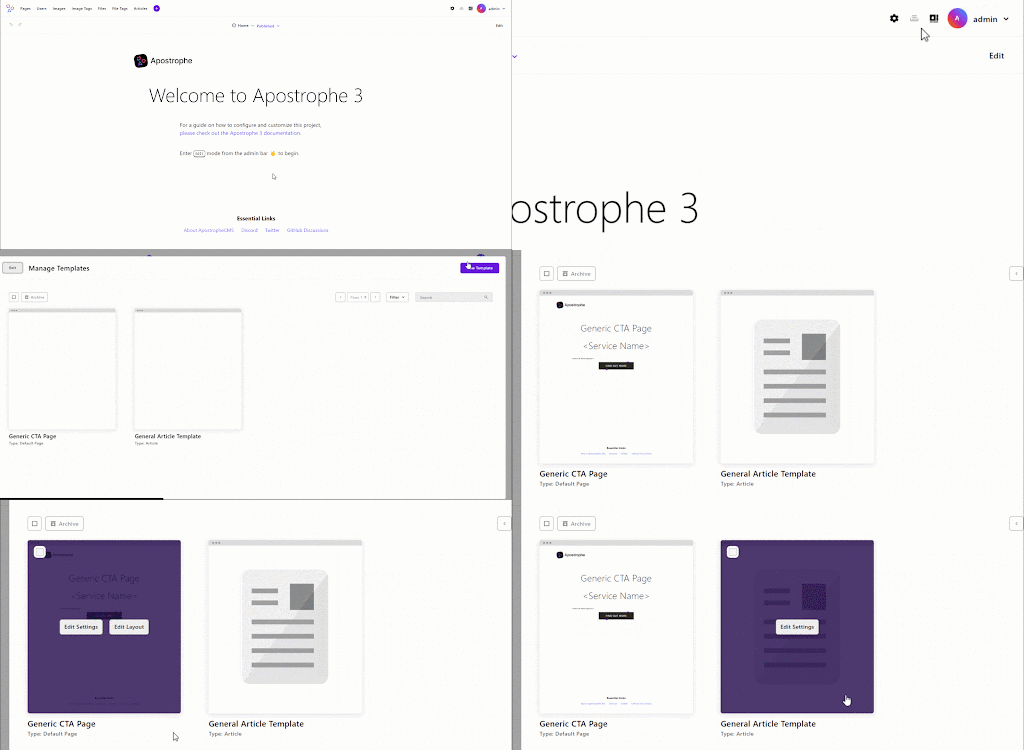
Here, editors can see and manage all the page and piece templates available. Each template is represented by a card containing the image specified at creation time or a live preview automatically generated by Apostrophe.
Given a template, content managers can:
- Edit: Change its settings or layout. This will only change the layout itself and not the pages or pieces based on it.
- Archive: Remove the template from the library. This will not affect pages or pieces created using the template.
- Duplicate: Generate a new template as a copy of the selected one.
Define a New Template
Editors can create a new template from scratch directly in the UI:
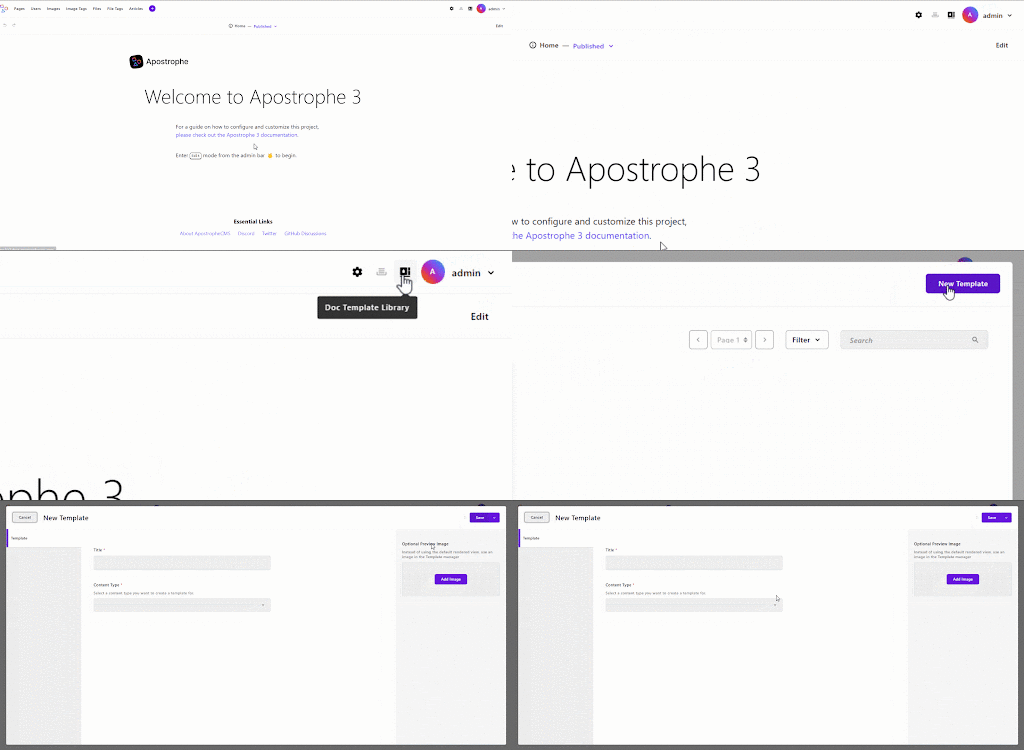
In the creation modal below, content managers need to:
- Give the template a name
- Add an optional overview image
- Select the content type associated with the template
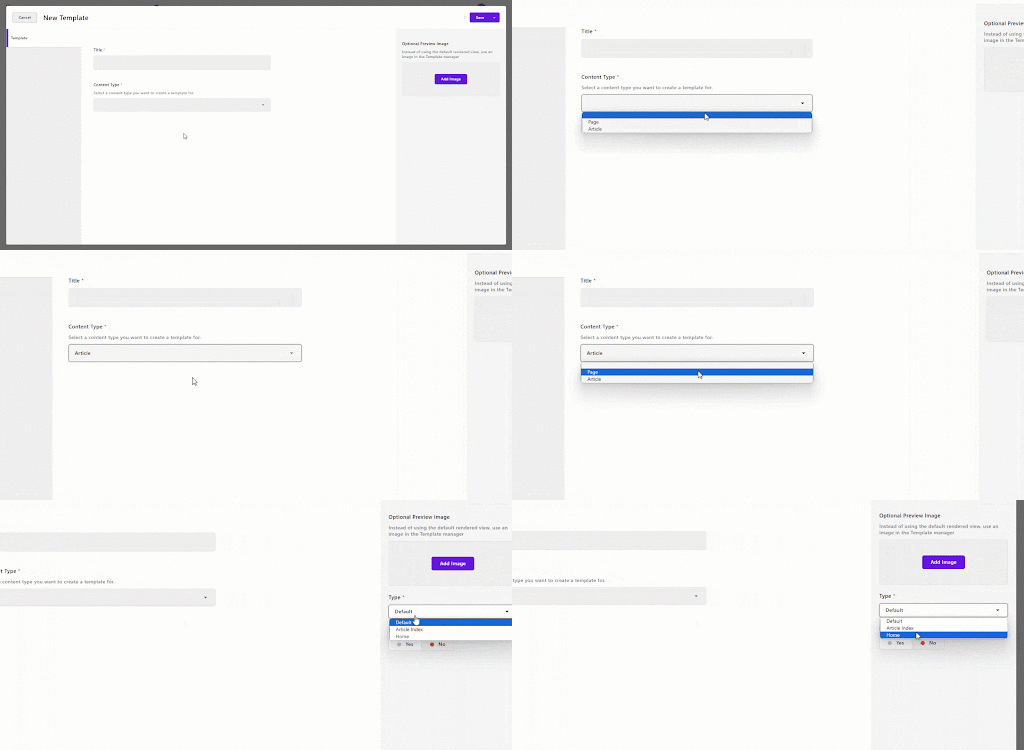
The content types available correspond to the list of page or piece types in the project.
After creating the template, Apostrophe will open a new page to define its content through the in-context editing feature.
For example, they could craft a template including instructions and tips for writing great articles:
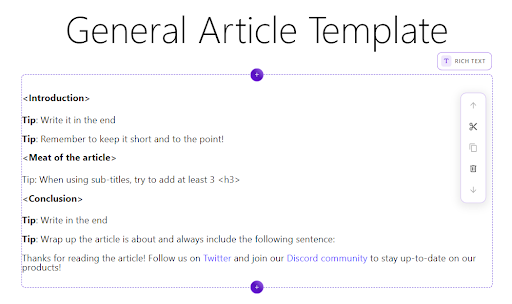
Et voilà! Adding a new template takes only a few clicks. Keep in mind that editors also have the option of turning existing pages and pieces into templates.
Apply a Template
When adding a new piece instance or page, editors can now select one of the templates available from the “Template” tab. After applying one, the area field of the piece instance will contain the same content as the template:
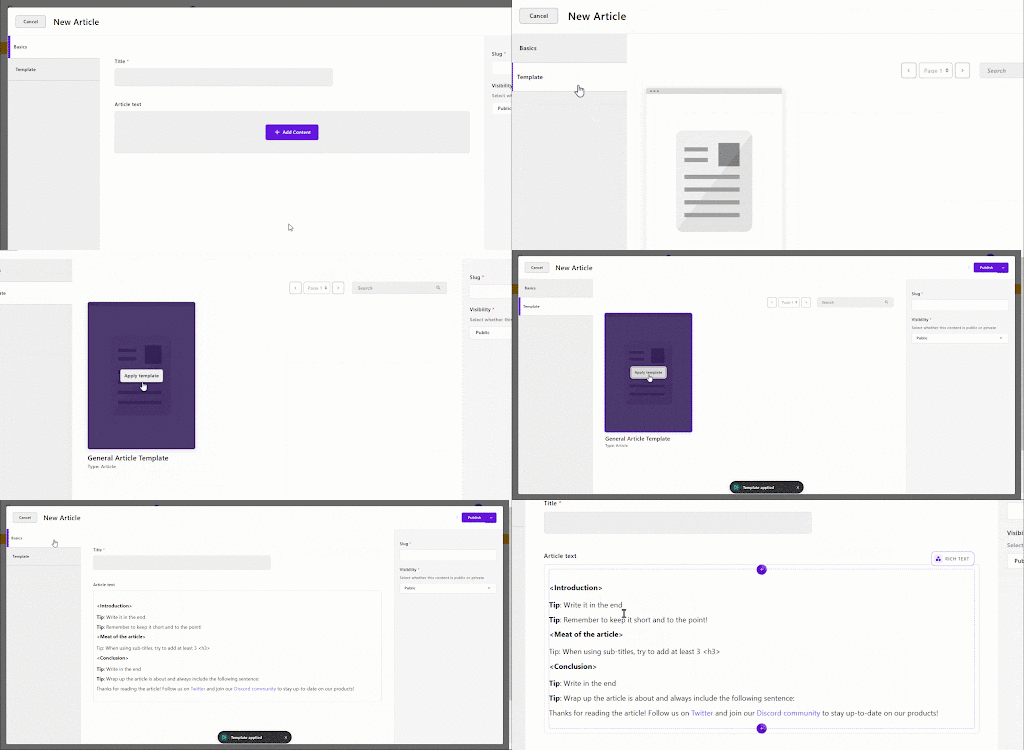
Just see how this mechanism simplifies creating high-quality content by providing effective starting points!
Extra: Excluding a Piece Type From Templates
The ability to create templates based on existing pieces is great, but you may want to disable it for specific piece types. To do so, set the hasTemplates field to false in the modules option in app.js:
require('apostrophe')({
  shortName: 'apos-template-library-demo',
  modules: {
    // other modules...
    article: {
      options: {
        hasTemplates: false // <-- disable template for this piece type
      }
    }
  }
});
Wait for the app to refresh, and you will no longer be able to select the article piece type in the template creation modal. Also, the “Save as template…” option on the piece type will disappear.
Perfect, you just disabled the template features on the selected piece type to editors as desired. With Apostrophe, you are in control!
Conclusion
In this tutorial, we dug into the Apostrophe Pro’s Template Library module from a technical point of view. As seen here, it brings a lot of benefits to editors and adding it to an existing Apostrophe project only takes a couple of minutes.
After setting it up, editors and content managers on your team will have the ability to transform current content into reusable templates. The consequences in terms of productivity and consistency are huge and are only a few lines of code away!

