Extensions & Integrations
Import-Export
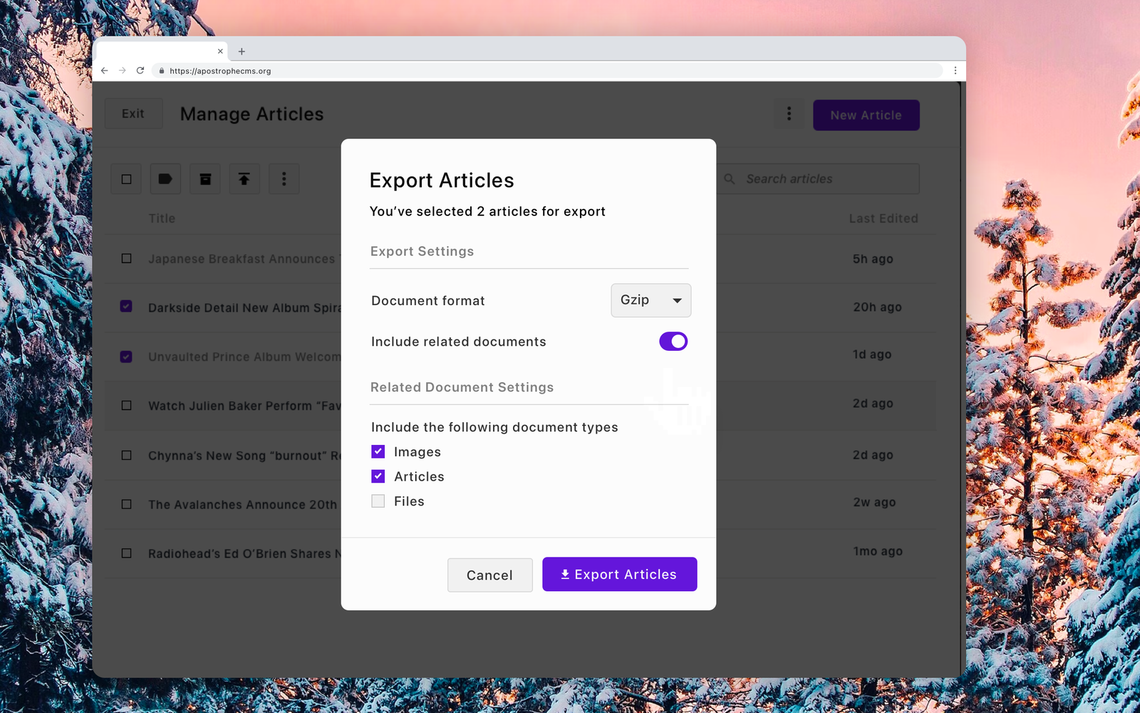
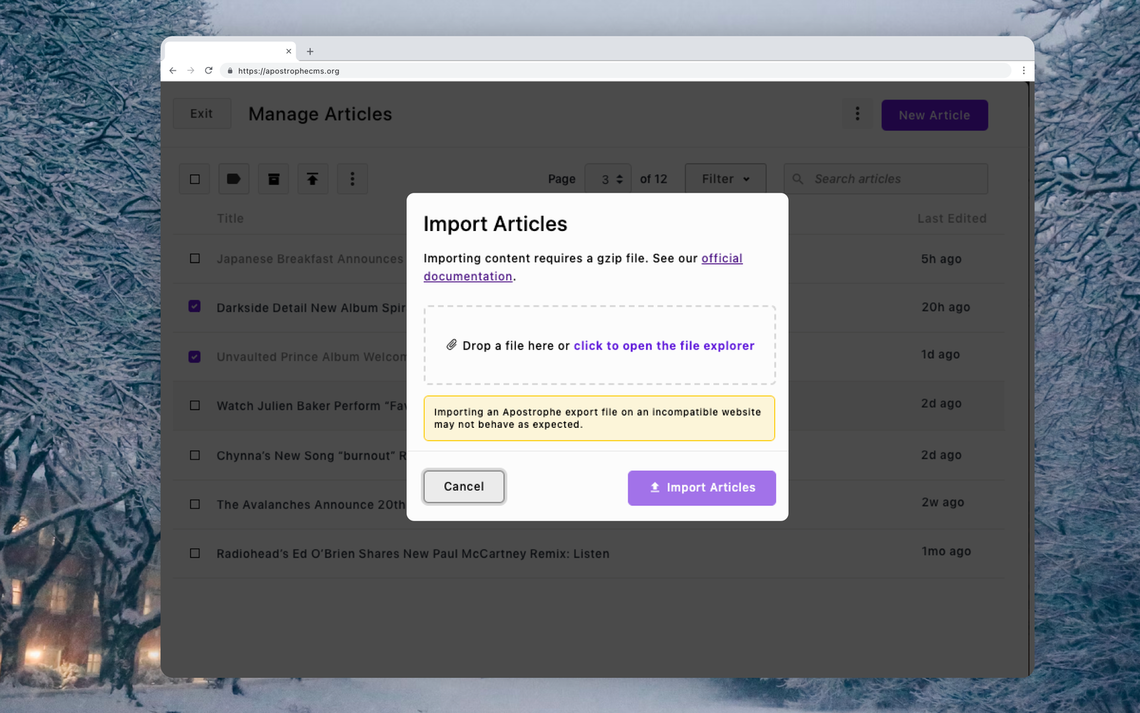
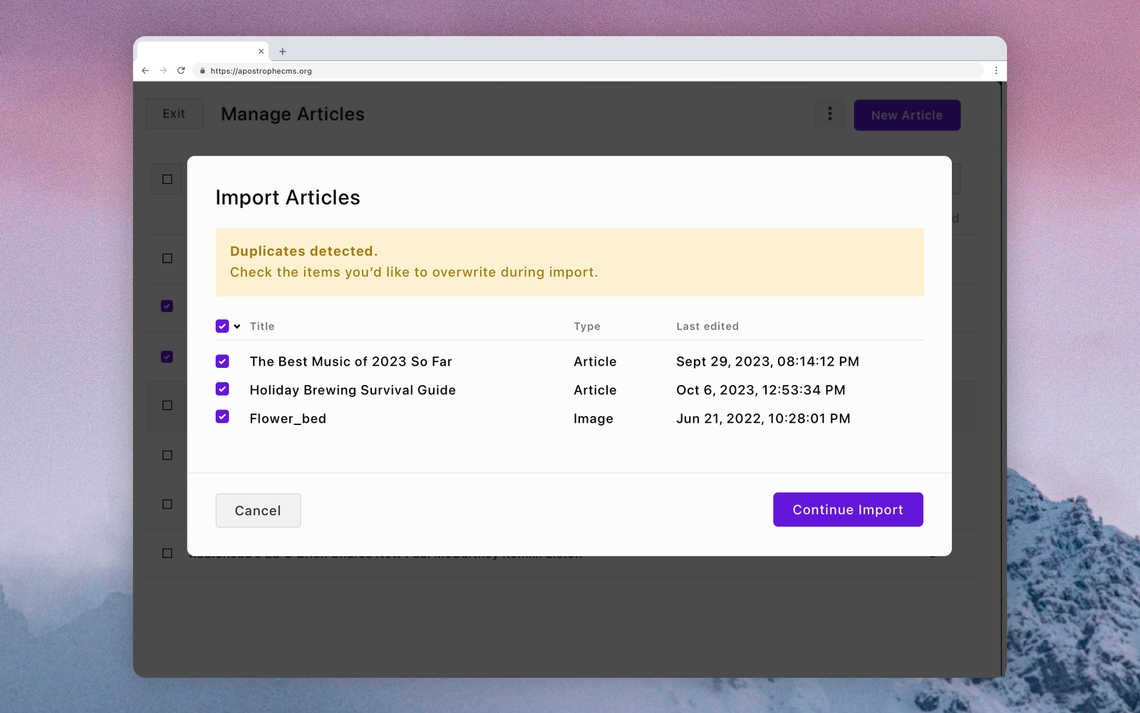
This module enables import and export of pages and pieces, with or without related documents such as files, images and other related types.
Installation
To install the module, use the command line to run this command in an Apostrophe project's root directory:
npm install @apostrophecms/import-export
Usage
Configure the module in the app.js file:
require('apostrophe')({
  shortName: 'my-project',
  modules: {
    '@apostrophecms/import-export': {}
  }
});
Exporting Files
Pages
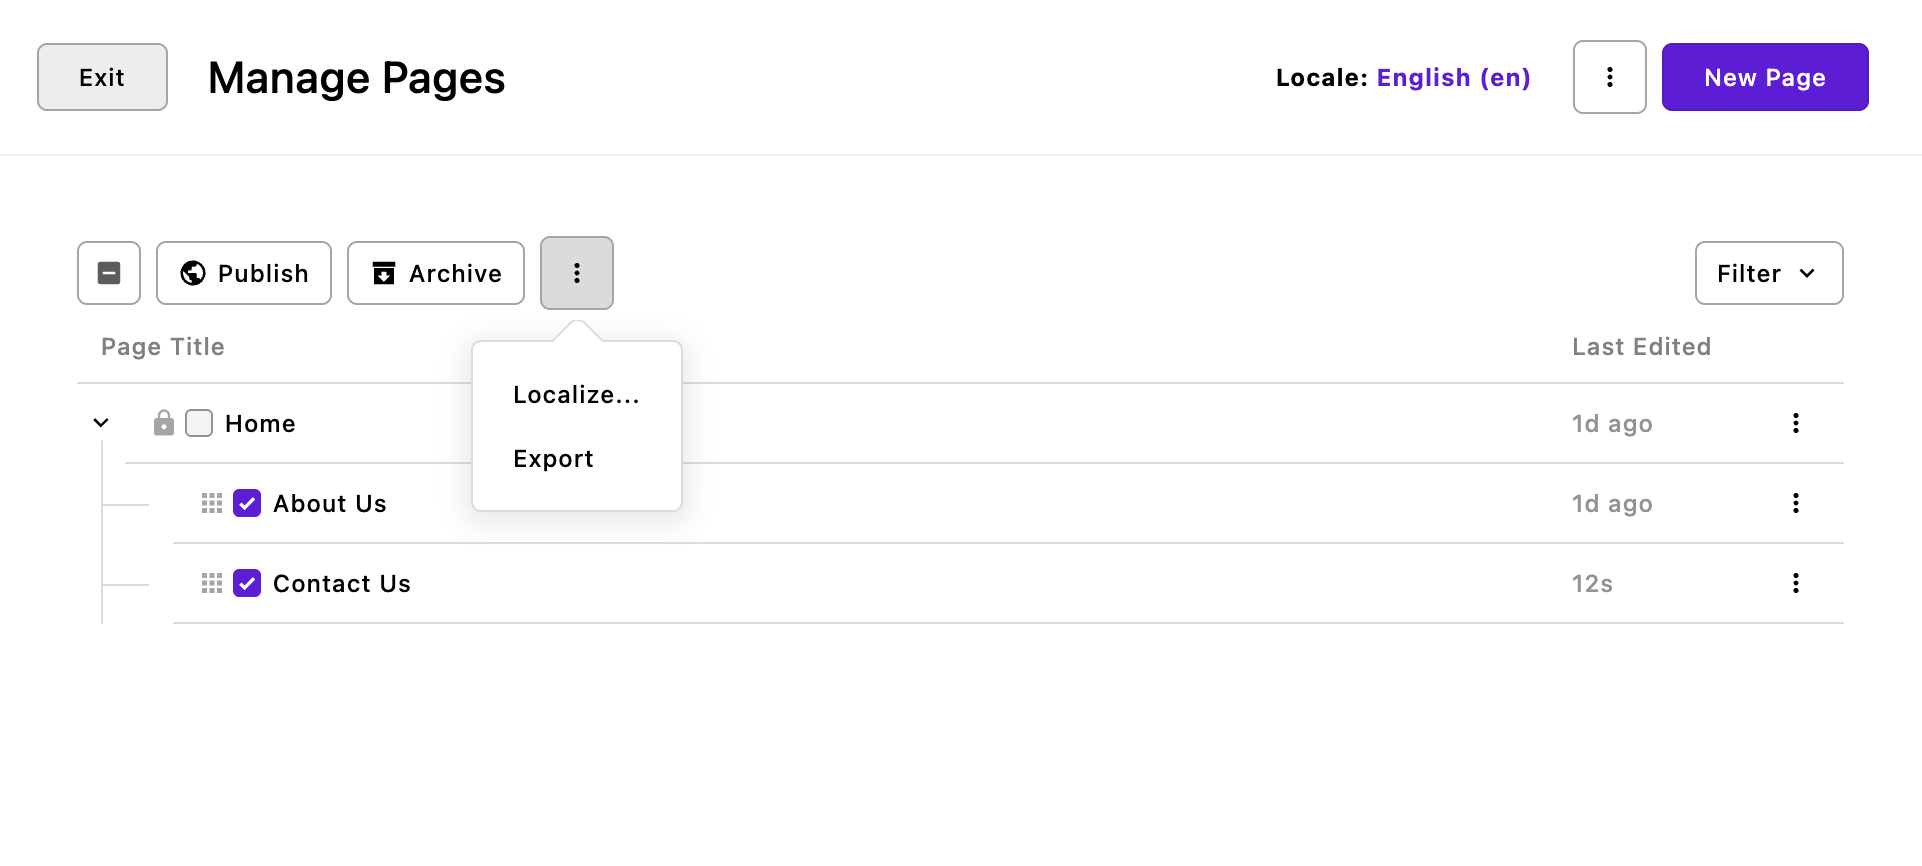
Pages can be exported by either selecting "Export" from the context menu for an individual page, or by selecting multiple pages and then selecting "Export" from the bulk operations context menu. When exporting a page it will retain its publication status upon import. A page that is published when exported will be published on import unless you select the option to only import as a draft document. Draft pages will remain in draft status.
Exporting the parent page in a set of nested documents will not export the child pages. Each child page must be exported separately. To maintain the page order, import the file for the parent document first, and then the files for the child documents.
If a page exists in multiple locales, only the page for the current locale will be exported, not for any other locale. The page must be exported separately for each locale.
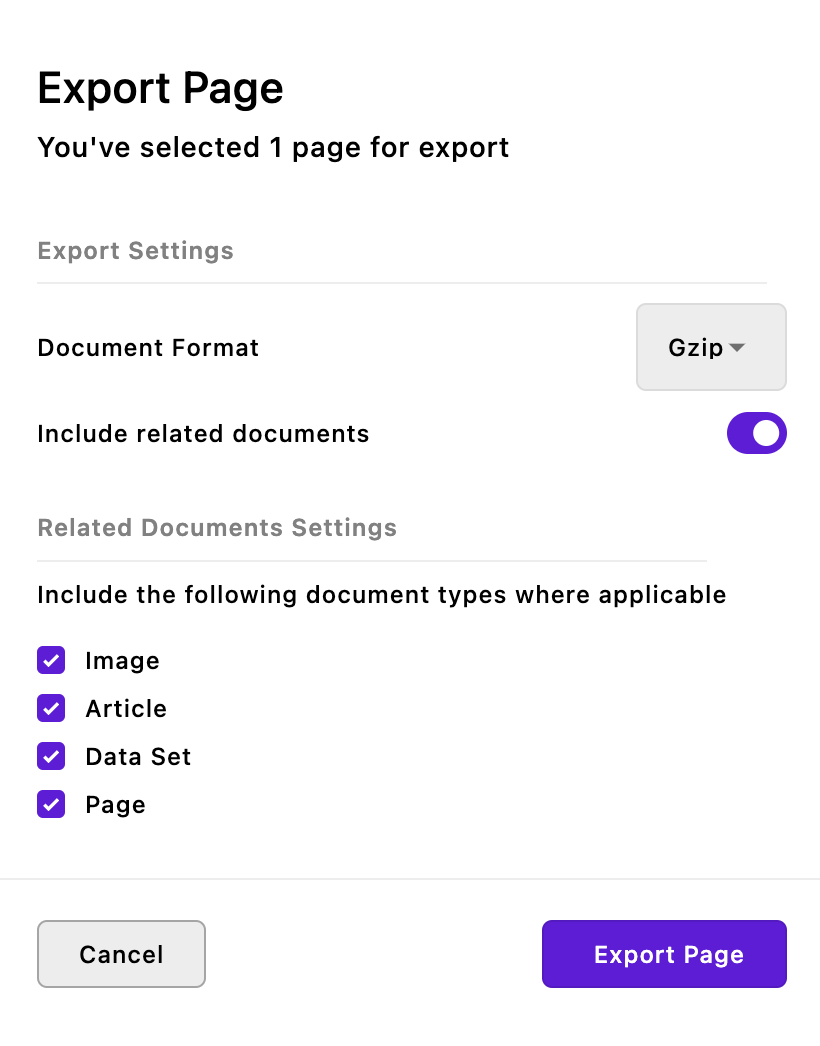
Clicking export will bring up a dialog box with two input controls.
The first is for selecting the file format to use for the exported file. Currently, the module only exports in the .tar.gz format, but this will possibly be expanded in the future.
The second input toggles whether documents associated with the page, like images, files, pieces, or pieces related via relationship fields in the document or its widgets, should be included in the download. Any or all can be unselected. Note that this doesn't mean that the particular page includes all of those document types, just that those document types both exist in your project and aren't disabled for export.
Clicking on the "Export Page" button will trigger a download of the export file to your local computer.
Pieces
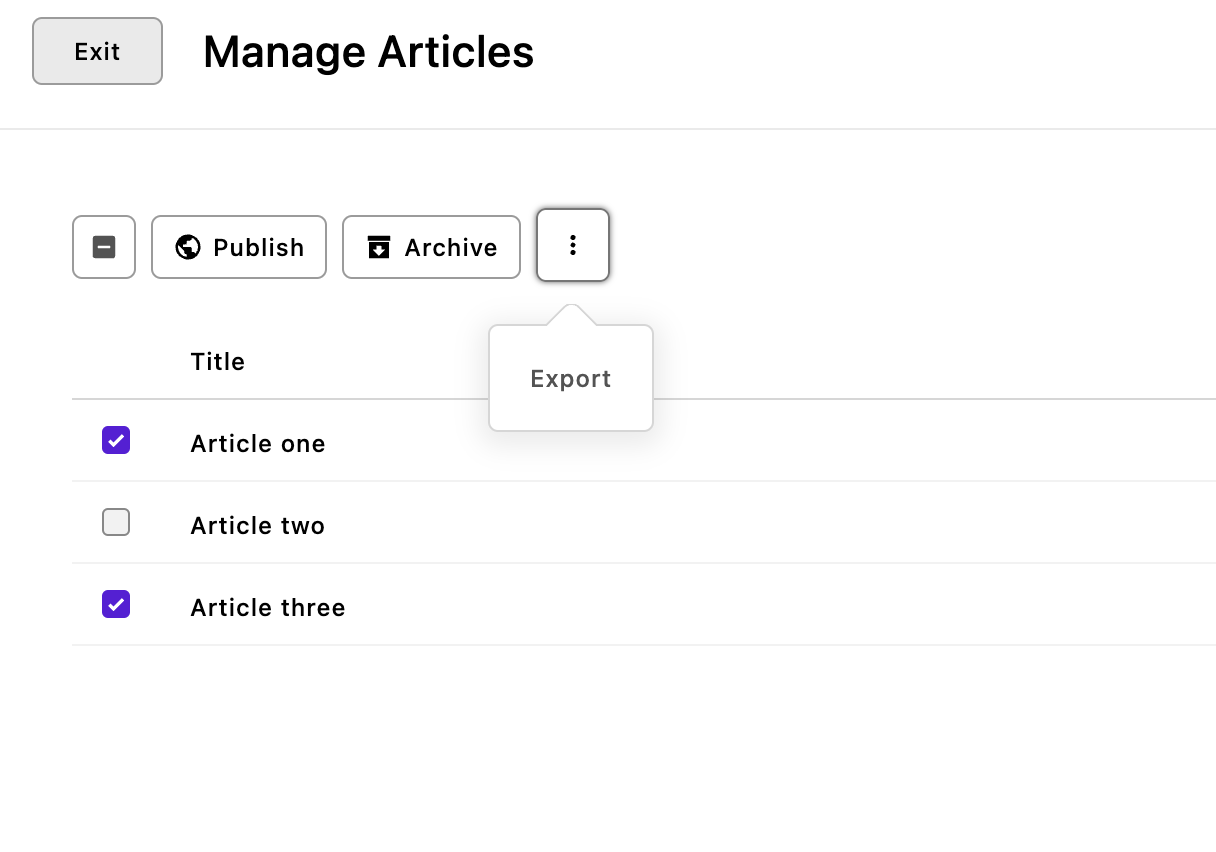
Unlike pages, pieces can be exported either individually from the context menu to the right of the piece, or as a batch using the context menu above the pieces list in the manager. For example, in the image above two articles have been selected for export. As with the page-type, all exporting is per-locale.
Clicking export will bring up the same dialog box that appears when exporting pages, allowing for the selection of related documents that should also be exported.
Templates
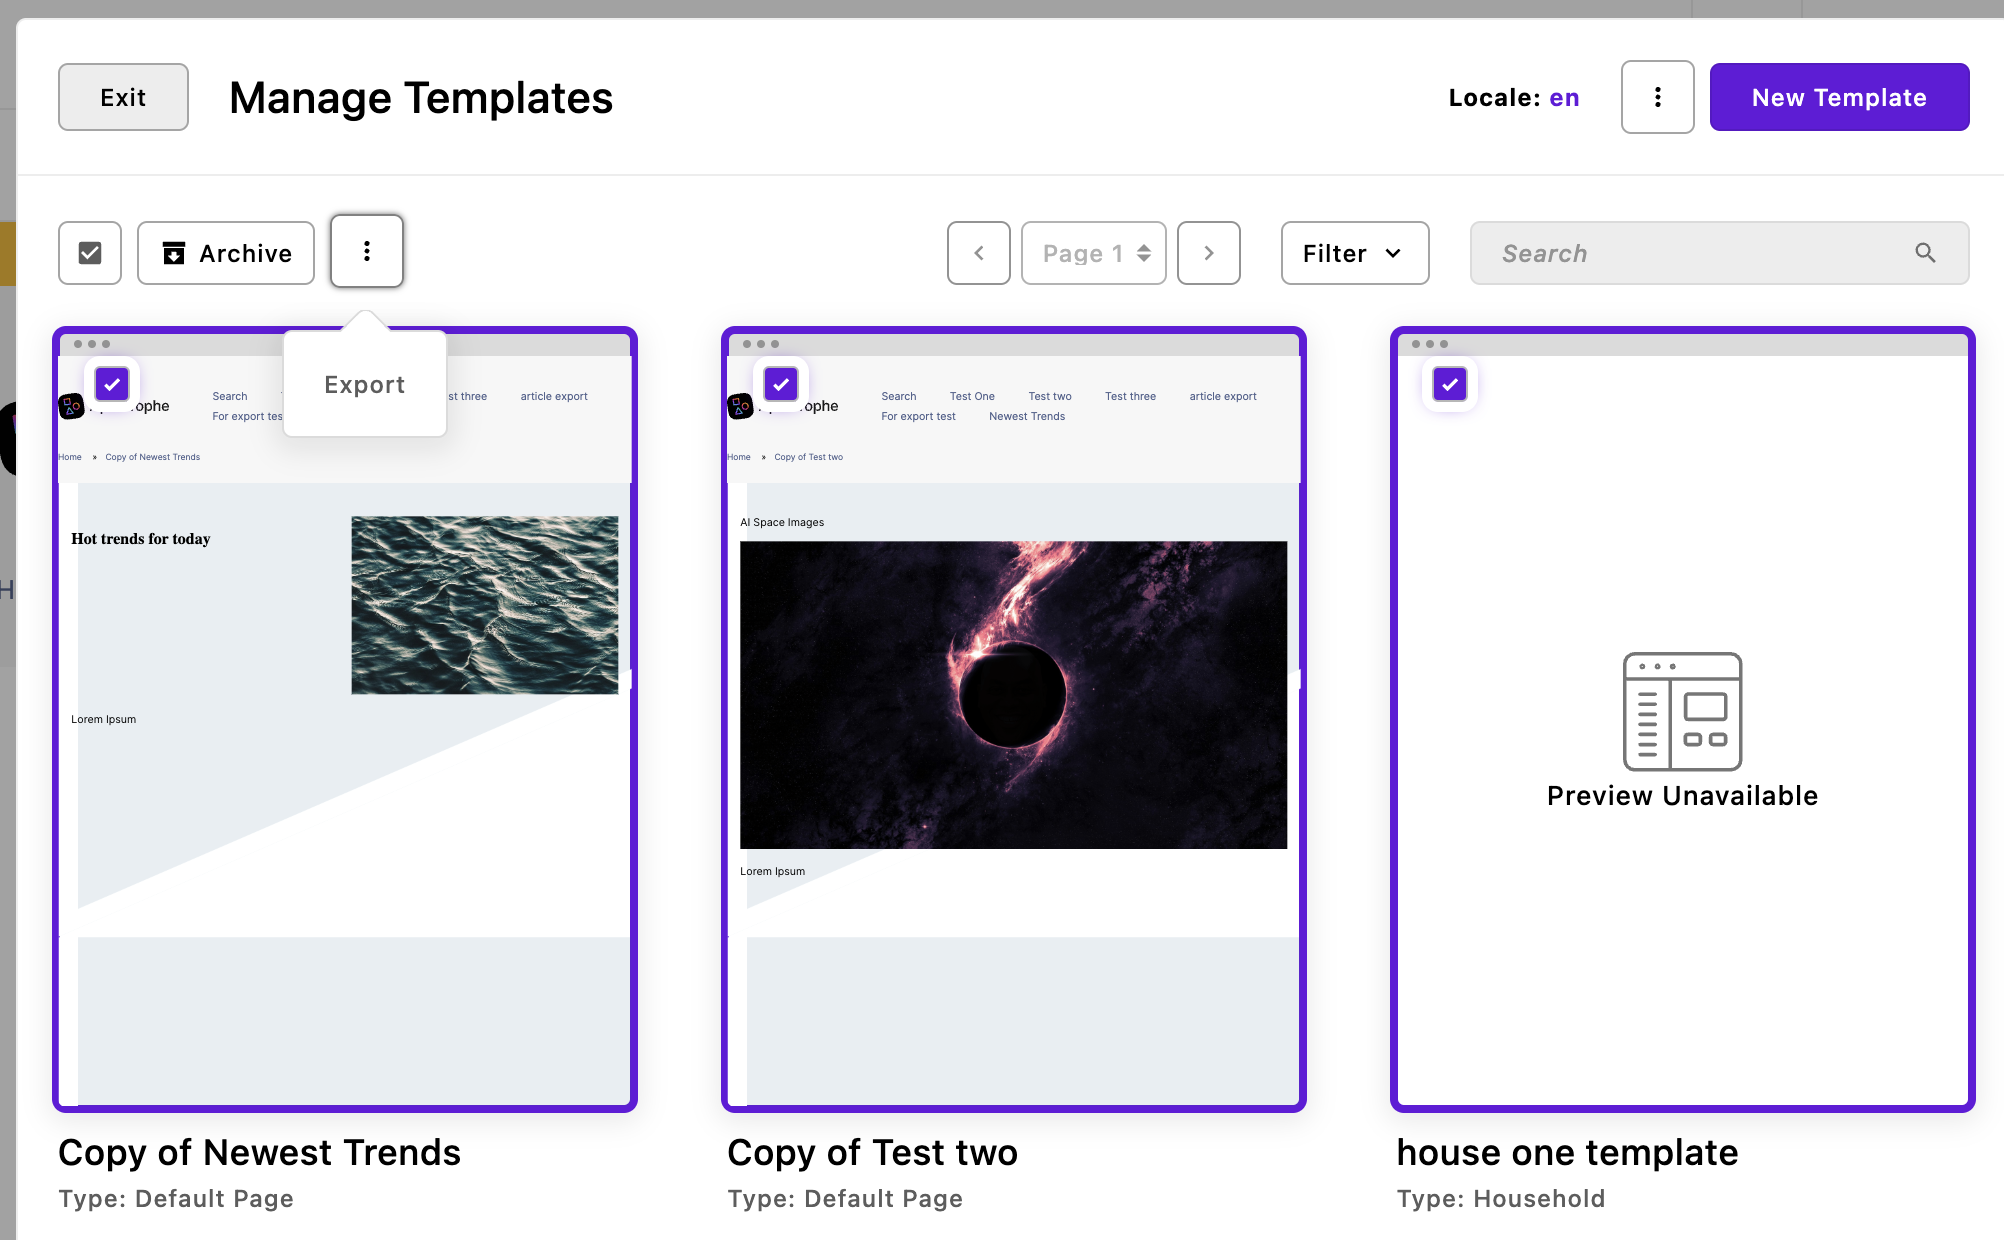
If you have the Template Library Pro module installed, templates are exported by selecting one or more within the template manager and then using the context menu located to the right of the batch operations. Like with the piece-type exporter you can elect to batch export just one or multiple documents depending on how many are checked. As with the page-type, all exporting is per-locale.
Clicking export will bring up the same dialog box that appears when exporting pages, allowing for the selection of related documents that also should be exported.
Importing files
 Any export file, no matter the content, can be imported using the utility context menu located at the top of the content managers, typically located to the left of the button to add new content of that type. This includes the page manager, any piece manager, or the document template manager if installed.
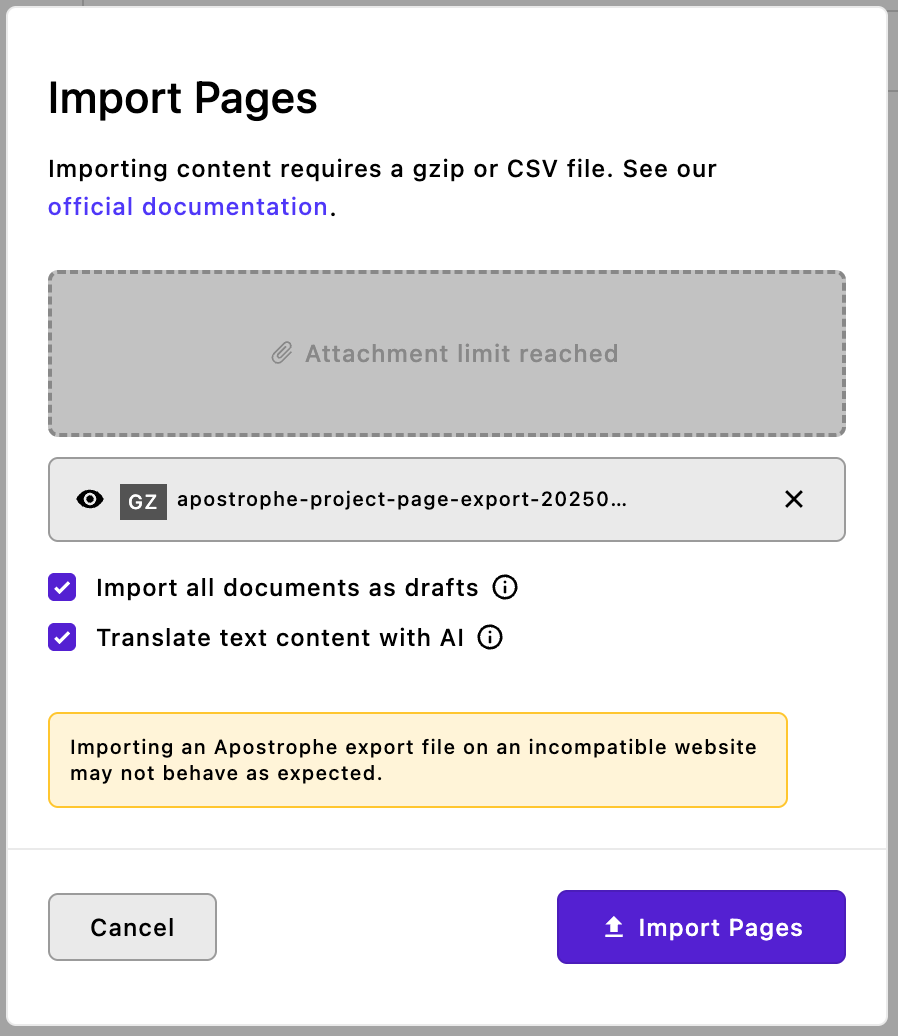
Clicking on the "Import" menu item will bring up a dialog box to select the export file you wish to import. You can only select one file at a time and the selection of an additional file will replace the first. At this stage, you can select to import any published pages as drafts. If you have the optional @apostrophecms-pro/automatic-translation extension installed and configured you can elect to translate the content into the language of the locale where you are performing the import. After you select the exported file and click on the import button, a progress bar will be shown and a success or failure notification when the file has been fully imported.
If the file you select has documents that already exist in your project, you'll get a notification and list of the documents that would be over-written. From that list you can choose documents you don't want imported. Note, if you have any documents that were previously published and then archived, they will trigger a duplicate overwrite warning.
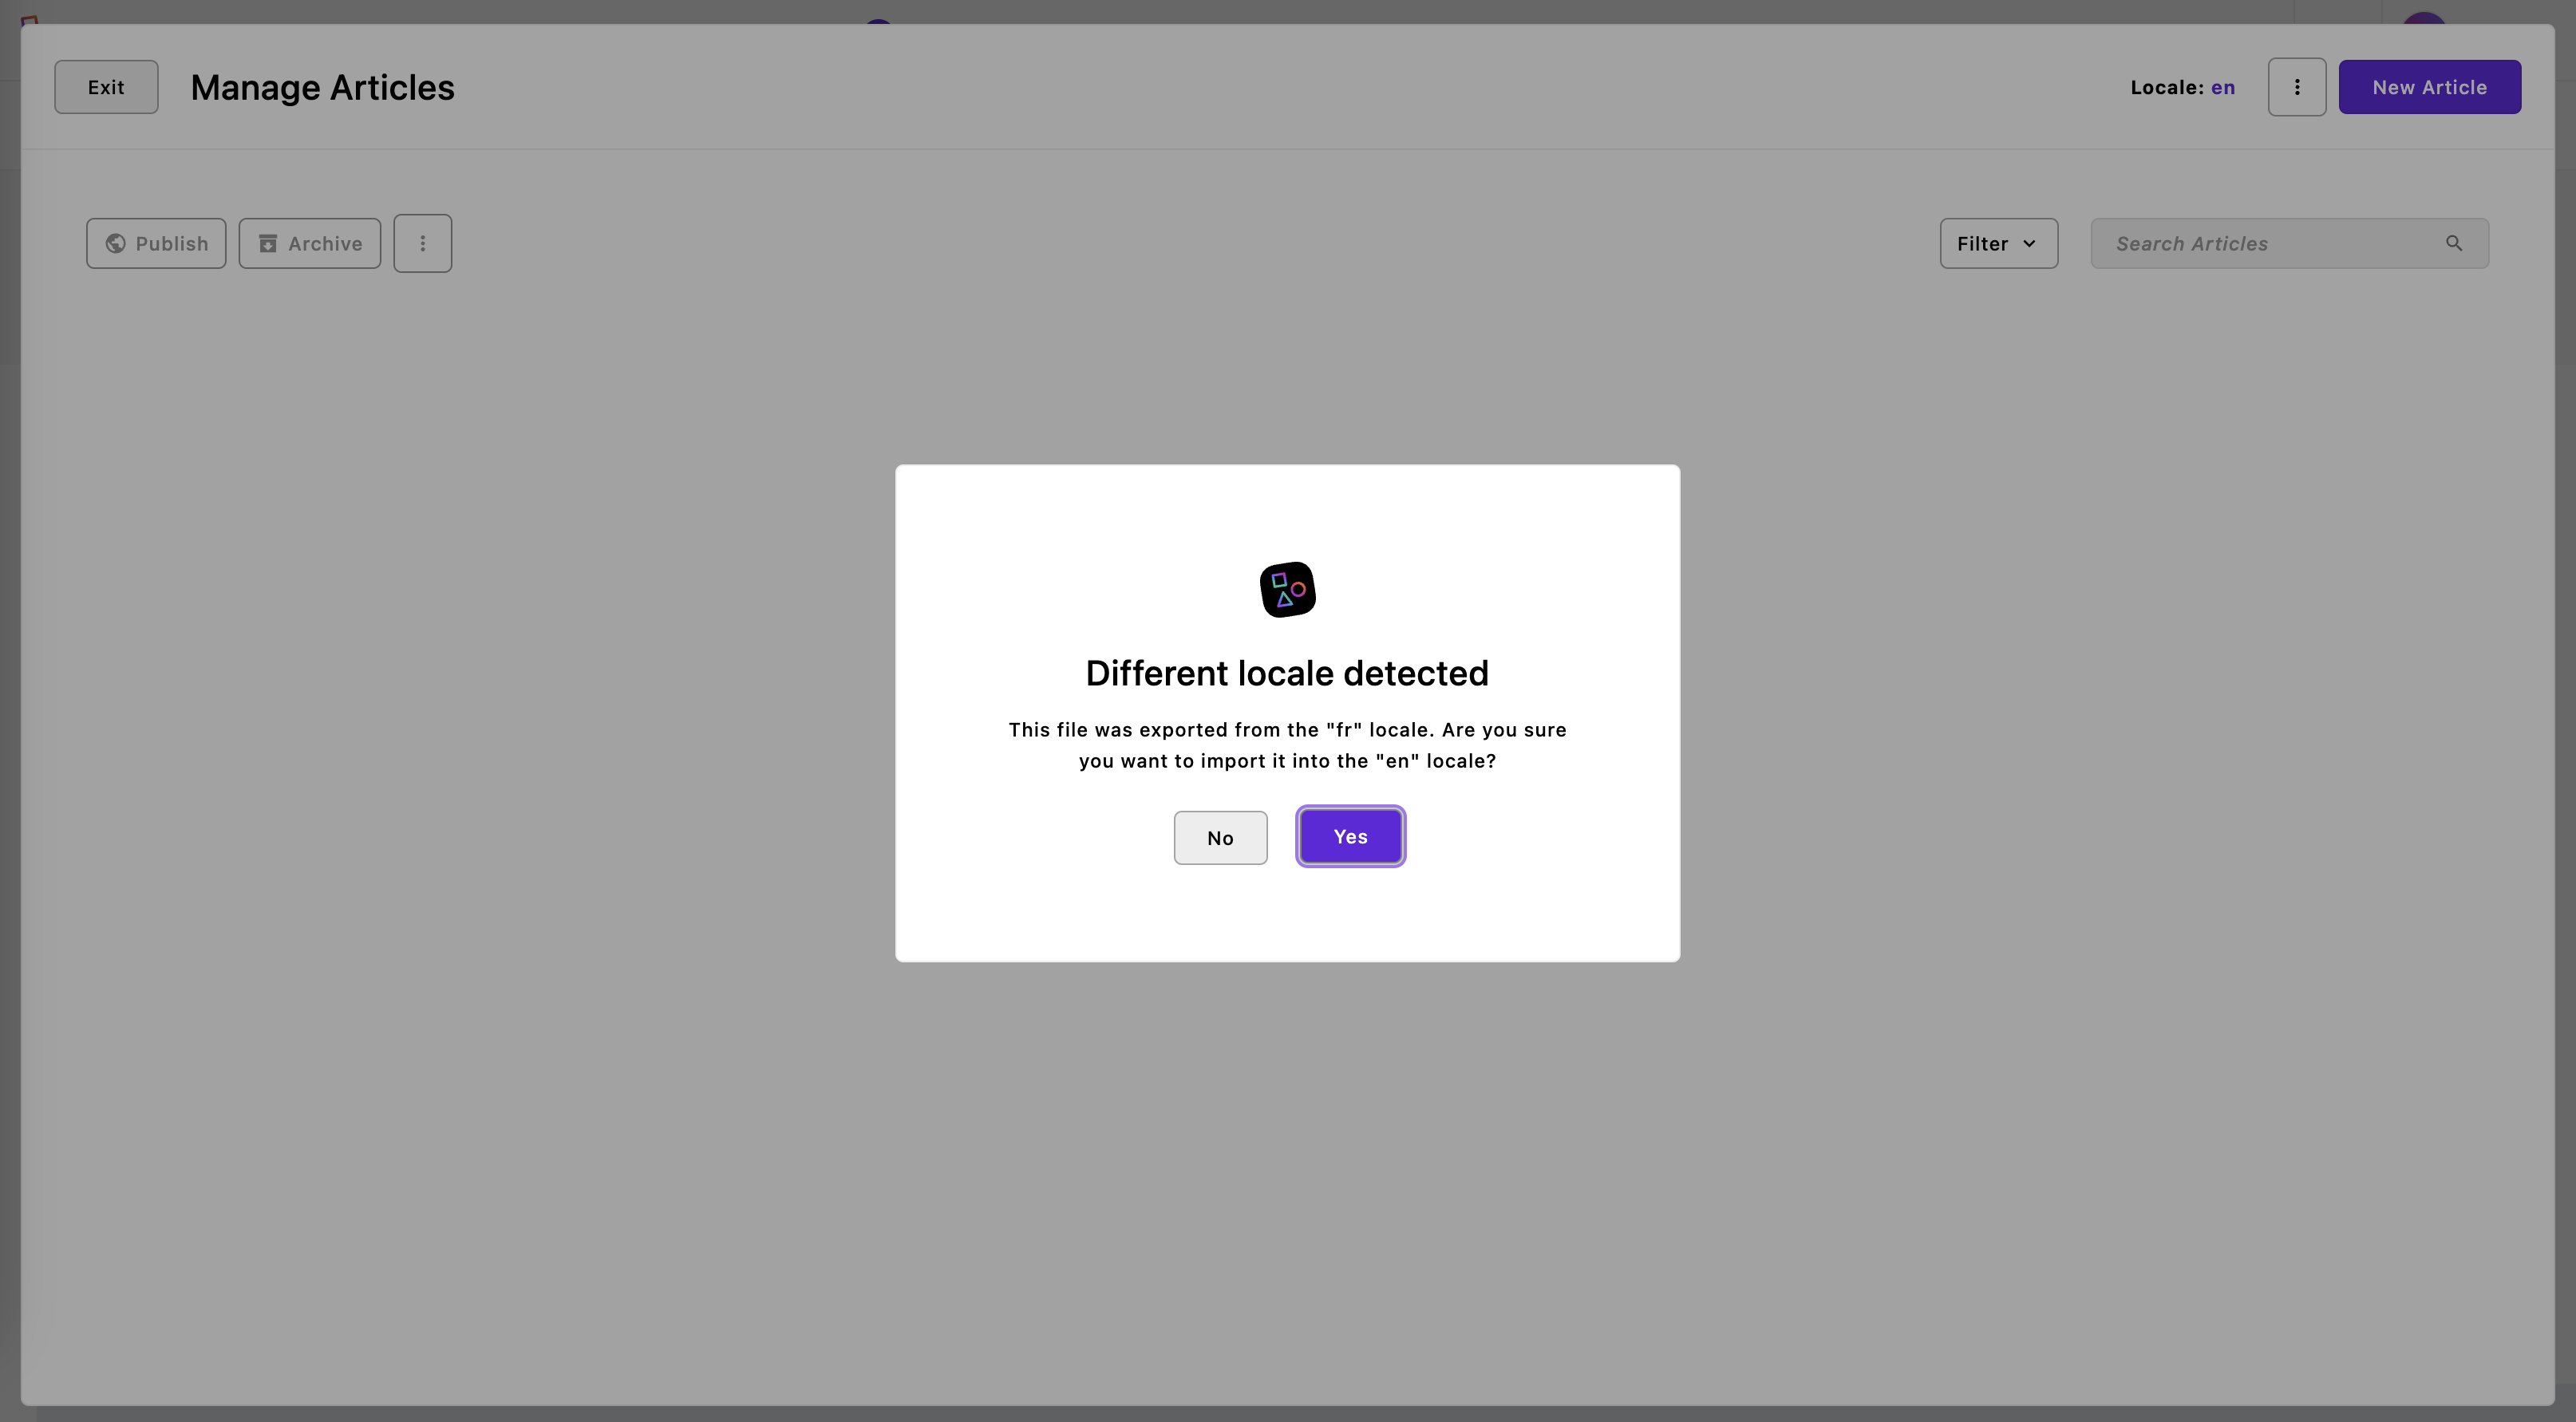
When importing a page, piece(s), or template(s) that was exported from one locale while currently in another locale, and you do not have the automatic translation module or have not elected to translate content, you will get a notification asking if you want to proceed.
When importing several files that comprise a set of nested pages, importing the file with the parental file before importing the child files will preserve the page order in the tree. If a file for a child document is imported before or independently of the parent document, then it will be added as a child of the homepage.
Warning - While you can rename the exported file, you must not change the file extension (.tar.gz) or content, or the import might not go as planned. You will also get an error when trying to import an incompatible file made with another file exporter, a file with an incorrect extension, or a file made with a version of the Import/Export module that has breaking changes from the currently installed version.
One caveat of sharing documents between sites is that the modules for page-types and piece-types must be the same in each. For example, if site A is using a page-type of
contact-page, a page of that type can only be imported into a site that also has acontact-pagemodule. If the codebase of the two projects are significantly different, it can either cause the import to fail, or some data to be lost if schema fields can't be reconciled.
Permissions
Users who have both 'create' and 'edit' permissions for a document type can export and import those documents. However, users with other permissions for a document type, but lacking both 'create' or 'edit' permissions, cannot import documents. They can still export documents of that type.
Options
You can disable the export and/or the import for any page- or piece-type using the importExport option. This option takes an object with import and export keys that take both can take boolean values.
export default {
  extend: '@apostrophecms/piece-type',
  options: {
    importExport: {
      import: true,
      export: false
    },
    label: 'Article',
    pluralLabel: 'Articles'
In this example, the 'Article' piece-type can be imported from a file, but users won't be allowed to export any of this type. This will also cause the export option to disappear from both the batch and individual 'Article' piece context menus in the 'Article' piece-type manager. Note that this will not impact other piece-types. The removal of the export menus from the respective managers will also occur if page-type or document templates are disabled for exporting. Finally, any disabled document type will not appear on the list of related documents.
Disabling a document type from being imported will remove the import item from the utility context menu of the respective document manager. It will also block insertion of any documents of that type when importing from the context menu of another manager. Finally, any export file that contains a related document type that is disabled for import will still successfully import for those document types that are allowed.
The export key can also take an object with an expiration property. The value of this property sets how long the export file will persist before being deleted. The default is 600000ms (10 min.), but can be extended if it is anticipated that the download will be delayed for some reason.
export default {
  extend: '@apostrophecms/piece-type',
  options: {
    importExport: {
      import: true,
      export: {
        expiration: 600000
      }
    },
    label: 'Article',
    pluralLabel: 'Articles'
Importing documents from another locale
Regardless of the original locale, imported documents are imported into the current locale. You will be prompted to confirm if the locale is different and you do not have, or are not opting to use, the automatic translation module.
If multiple locales are set up, the user will be prompted to choose between canceling the import or proceeding with it, unless the user has elected to translate the content.
Automatic translation
If the @apostrophecms-pro/automatic-translation module is installed, the import modal will offer a "Translate" checkbox. When selected, the module will automatically translate the imported documents to the current site's locale using the configured translation service.
When the "Translate" checkbox is selected, the confirm modal letting the user choose between aborting on continuing the import when the docs locale is different from the site, will be suppressed and the import will proceed without any further user interaction.
Importing as drafts only
The import modal includes a checkbox labeled "Import all documents as drafts" that, when selected, imports the published version of documents in draft status only. This feature allows users to review and make modifications to imported documents before they are published.
By default, this checkbox can be set to selected by enabling the importDraftsOnlyDefault: true option in this module.
If a document in the import file has no published version, it will still be imported. Content types that do not have separate drafts will be imported normally.
Updating existing pieces using CSV format
You can also update existing pieces via this module.
To do that, you will need one (and only one) key column in your file. This column's name must be exactly the name of the existing field that uniquely identifies each row as an update of a specific existing piece, followed by :key.
For instance, if you need to change the usernames of users in bulk, you might prepare a CSV file like this:
username:key,username
bobsmith,bob.smith
janedoe,jane.doe
The key column is the old value. You may optionally also present a new value for that same column in a separate column without :key. You may also include other columns, as you see fit. The important thing is that you must have one and only one :key column in order to carry out updates.
Please note that both the draft and the published versions will be updated, even if one of them does not match the key column value.
Mixing inserts and updates
If a row has no value for your :key column, it is treated as an insert, rather than an update.
Importing rich text (HTML) rather than plaintext
By default, if you create a column in your CSV file for a field of type area, it will be imported as plaintext. Any special characters like < and > will be escaped so the user can see them. HTML is not supported.
To import areas as rich text HTML markup, add the importAsRichText: true option to the area field in your schema.
How to add a new format?
Create a file for your format:
Add your format under lib/formats/<format_name>.js and export it in lib/formats/index.js.
Simple example (for a single file without attachment files):
// lib/formats/ods.js
module.exports = {
  label: 'ODS',
  extension: '.ods',
  allowedExtension: '.ods',
  allowedTypes: [ 'application/vnd.oasis.opendocument.spreadsheet' ],
  async input(filepath) {
    // Read `filepath` using `fs.createReadStream`
    // or any reader provided by a third-party library

    // Return parsed docs as an array
    return { docs };
  },
  async output(filepath, { docs }) {
    // Write `docs` into `filepath` using `fs.createWriteStream`
    // or any writer provided by a third-party library
  }
};
Note: The input and output functions should remain agnostic of any apostrophe logic.
// lib/formats/index.js
const ods = require('./ods');

module.exports = {
  // ...
  ods
};
For formats with attachment files:
If you want to add a format that includes attachment files such as an archive, you can enable the includeAttachments option and utilize extra arguments provided in the input and output functions.
Advanced example:
// lib/formats/zip.js
module.exports = {
  label: 'ZIP',
  extension: '.zip',
  allowedExtension: '.zip',
  allowedTypes: [
    'application/zip',
    'application/x-zip',
    'application/x-zip-compressed'
  ],
  includeAttachments: true,
  async input(filepath) {
    let exportPath = filepath;

    // If the given path is the archive, we first need to extract it
    // and define `exportPath` to the extracted folder, not the archive
    if (filepath.endsWith(this.allowedExtension)) {
      exportPath = filepath.replace(this.allowedExtension, '');

      // Use format-specif extraction
      await extract(filepath, exportPath);
      await fsp.unlink(filepath);
    }

    // Read docs and attachments from `exportPath`
    // given that they are stored in aposDocs.json and aposAttachments.json files:
    const docs = await fsp.readFile(path.join(exportPath, 'aposDocs.json'));
    const attachments = await fsp.readFile(path.join(exportPath, 'aposAttachments.json'));
    const parsedDocs = EJSON.parse(docs);
    const parsedAttachments = EJSON.parse(attachments);

    // Add the attachment names and their path where they are going to be written to
    const attachmentsInfo = parsedAttachments.map(attachment => ({
      attachment,
      file: {
        name: `${attachment.name}.${attachment.extension}`,
        path: path.join(exportPath, 'attachments', `${attachment._id}-${attachment.name}.${attachment.extension}`)
      }
    }));

    // Return parsed docs as an array, attachments with their extra files info
    // and `exportPath` since it we need to inform the caller where the extracted data is:
    return {
      docs: parsedDocs,
      attachmentsInfo,
      exportPath
    };
  },
  async output(
    filepath,
    {
      docs,
      attachments = [],
      attachmentUrls = {}
    },
    processAttachments
  ) {
    // Store the docs and attachments into `aposDocs.json` and `aposAttachments.json` files
    // and add them to the archive

    // Create a `attachments/` directory in the archive and store the attachment files inside it:
    const addAttachment = async (attachmentPath, name, size) => {
      // Read attachment from `attachmentPath`
      // and store it into `attachments/<name>` inside the archive
    }
    const { attachmentError } = await processAttachments(attachmentUrls, addAttachment);

    // Write the archive that contains `aposDocs.json`, `aposAttachments.json` and `attachments/`
    // into `filepath` using `fs.createWriteStream` or any writer provided by a third-party library

    // Return potential attachment processing error so that the caller is aware of it:
    return { attachmentError };
  }
};
Add formats via a separate module
You might want to scope one or multiple formats in another module for several reasons:
- The formats rely on a dependency that is not hosted on NPM (which is the case with @apostrophecms/import-export-xlsx)
- You want to fully scope the format in a separate module and repository for an easier maintenance
- ...
To do so, simply create an apostrophe module that improves @apostrophecms/import-export and register the formats in the init method.
Example with an import-export-excel module:
const formats: {
  xls: {
    label: 'XLS',
    extension: '.xls',
    allowedExtension: '.xls',
    allowedTypes: [ 'application/vnd.ms-excel' ],
    async input(filepath) {},
    async output(filepath, { docs }) {}
  },
  xlsx: {
    label: 'XLSX',
    extension: '.xlsx',
    allowedExtension: '.xlsx',
    allowedTypes: [ 'application/vnd.openxmlformats-officedocument.spreadsheetml.sheet' ],
    async input(filepath) {},
    async output(filepath, { docs }) {}
  }
};

module.exports = {
  improve: '@apostrophecms/import-export',
  init(self) {
    self.registerFormats(formats);
  }
};
Then add the module to the project package.json and app.js.


